Data archiving with Mqfilter and Tee filters
Data archiving with Mqfilter and Tee filters
This tutorial gives a quick look into how you can combine various filters to create systems for archiving data for analysis. The aim of this tutorial is to show what can be done with MaxScale's filters rather than demonstrate a proven method of archiving data. For this tutorial you will need two MariaDB/MySQL servers, one for archiving the data and one for actual use, a RabbitMQ server and a MaxScale server. For testing purposes some of these can locate on the same server but for actual use, an HA solution is recommended.
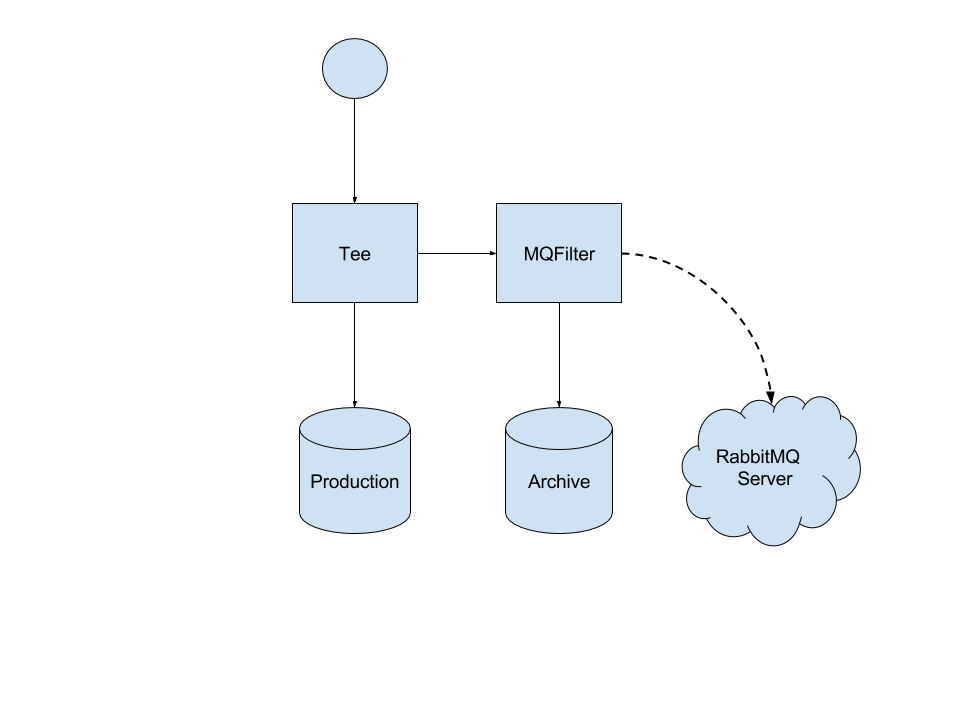
The use case for this tutorial is a production system with one main server where all queries are routed and an archive server where only INSERT, UPDATE and DELETE statements are routed. The queries routed to the archive servers are also transformed into a canonical format and sent to a RabbitMQ broker for analysis. This setup allows us to control what we send to the server and could possibly allow us to filter out DELETE statements completely, making the archive server a true archive of all data.
Setting up MaxScale
The installation of MaxScale is covered in the Installation chapter of the MaxScale Tutorial.
Setting up the MariaDB/MySQL servers
Since the archive server will not replicate from the main server, we don't need to set up replication between the two. The only thing we need to do is to create the users we will use for monitoring and authentication.
The process of creating monitoring and authentication users for MaxScale is described in the Creating Database Users section of the MaxScale Tutorial.
Setting up RabbitMQ server
To set up the RabbitMQ server, follow the instructions for your OS on the RabbitMQ website.
Useful documentation about access rights can be found on the Access Control
page and for UNIX systems the rabbitmqctl manpage
has all the needed commands to manage your installation of RabbitMQ.
For this tutorial, we will use a RabbitMQ server installed on a CentOS 7 from the RPM packages. Since CentOS 7 doesn't have the RabbitMQ server in the default repositories, we will need two extra repositories: The EPEL repository and the Erlang repository.
First we need the EPEL and Erlang repositories for CentOS 7 after which we will install the RabbitMQ server:
sudo yum -y install https://dl.fedoraproject.org/pub/epel/epel-release-latest-7.noarch.rpm
sudo yum -y install http://packages.erlang-solutions.com/erlang-solutions-1.0-1.noarch.rpm
sudo yum -y install https://www.rabbitmq.com/releases/rabbitmq-server/v3.5.6/rabbitmq-server-3.5.6-1.noarch.rpm
Next step is to start the RabbitMQ server and configure it.
sudo systemctl start rabbitmq-server
We need to create the msguser account which we will use to relay the messages
to the broker. This can be done with the rabbitmqctl command.
sudo rabbitmqctl add_user "msguser" "msgpwd"
sudo rabbitmqctl set_permissions "msguser" ".*" ".*" ".*"
This creates the msguser account with msgpwd as the password and grants read, write and configurations
permissions on the default virtual host /.
Configuration file creation
The final step before testing is the creation of the maxscale.cnf file. We start off by adding the two servers to the configuration file.
[production-1]
type=server
address=192.168.0.200
port=3306
protocol=MySQLBackend

[archive-1]
type=server
address=192.168.0.201
port=3000
protocol=MySQLBackend
After we have defined the production-1 and archive-1 servers, we need a monitor
module for those servers. This module will detect if connectivity to the servers
is lost and notify MaxScale of the changed server states.
[MySQL Monitor]
type=monitor
module=mysqlmon
servers=production-1, archive-1
user=maxuser
passwd=maxpwd
monitor_interval=5000
The monitor will use the user maxuser with the password maxpwd to connect to
the servers and query them for their state. In the servers parameter we have
listed both of the production-1 and archive-1 servers. All objects in the
MaxScale configuration file are referred by their section names. Here the section
names of the servers are used in the servers parameter. The monitor_interval
parameter controls how often the monitor will poll the servers for status. For
this tutorial, we've set it to 5000 milliseconds.
Next we configure the Production and Archive services. The Production service will be the main access point to the system.
[Production]
type=service
router=readconnroute
servers=production-1
user=maxuser
passwd=maxpwd
filters=Tee

[Archive]
type=service
router=readconnroute
servers=archive-1
user=maxuser
passwd=maxpwd
filters=MQ Filter
The filters parameters for the services refer to the filters we will be creating next.
The Production service will use the Tee filter to duplicate INSERT, UPDATE and DELETE
statements to the Archive service. The statements passed to the Archive service will
use the MQ Filter to send the canonical versions of the statements to the RabbitMQ broker.
The Production service will use the production-1 server and the Archive service will
use the archive-1 server. Both services user the maxuser user with the maxpwd password.
Next we will configure the listeners for these two services.
[Production Listener]
type=listener
service=Production
protocol=MySQLClient
port=4000

[Archive Listener]
type=listener
service=Archive
protocol=MySQLClient
port=4001
The port parameter controls which port the listener will listen on and where the client
connections should be made. The service parameter tells which listener belongs to which
service.
After the services and their listeners are configured we will configure the two filters we'll use. We begin with the Tee filter.
[Tee]
type=filter
module=tee
service=Archive
match=\(insert\)\|\(update\)\|\(delete\)
The service parameter controls which service we want to duplicate the statements to.
This needs to be set to the section name of the archive service: Archive. The match
parameter is a regular expression which, if matched, cause the statement to be duplicated.
Here we will want a regular expression which will match the INSERT, UPDATE and DELETE
statements.
After the Tee filter is configured, we will configure the Mqfilter to communicate with the RabbitMQ server we've set up.
[MQ Filter]
type=filter
module=mqfilter
hostname=192.168.0.201
port=5672
username=msguser
password=msgpwd
exchange=msg-ex-1
queue=msg-queue-1
key=MaxScale
The hostname is the address and the port is the port of the RabbitMQ server. For
username and password we will use the msguser and msgpwd credentials we
created earlier. The exchange is the name of the RabbitMQ exchange we're using and
the key is the key used for all the sent messages. The messages will be stored
in the mxs-queue-1 queue.
The last thing to add is the administration interface.
[MaxAdmin Service]
type=service
router=cli

[MaxAdmin Listener]
type=listener
service=MaxAdmin Service
protocol=maxscaled
port=6603
Now we have created the MaxScale configuration file and all we need to do is to save
it in /etc/maxscale.cnf, start MaxScale and test that it works. The testing will
be done in the next section.
Here is the complete configuration file.
# The production and archive servers
[production-1]
type=server
address=192.168.0.200
port=3306
protocol=MySQLBackend

[archive-1]
type=server
address=192.168.0.201
port=3000
protocol=MySQLBackend

# MySQL server monitor
[MySQL Monitor]
type=monitor
module=mysqlmon
servers=production-1, archive-1
user=maxuser
passwd=maxpwd
monitor_interval=5000

# Production service
[Production]
type=service
router=readconnroute
servers=production-1
user=maxuser
passwd=maxpwd
filters=Tee

# Archive service
[Archive]
type=service
router=readconnroute
servers=archive-1
user=maxuser
passwd=maxpwd
filters=MQ Filter

# Listeners for the services
[Production Listener]
type=listener
service=Production
protocol=MySQLClient
port=4000

[Archive Listener]
type=listener
service=Archive
protocol=MySQLClient
port=4001

# Tee filter to duplicate insert, update and delete
# statements to the archive server
[Tee]
type=filter
module=tee
service=Archive
match=\(insert\)\|\(update\)\|\(delete\)

# Mqfilter to log the canonical versions of the archive
# server queries to a RabbitMQ broker
[MQ Filter]
type=filter
module=mqfilter
hostname=192.168.0.201
port=5672
username=msguser
password=msgpwd
exchange=msg-ex-1
queue=msg-queue-1
key=MaxScale

# Administration interface setup
[MaxAdmin Service]
type=service
router=cli

[MaxAdmin Listener]
type=listener
service=MaxAdmin Service
protocol=maxscaled
port=6603
Testing the setup
Now that we have created the configuration file, prepared the RabbitMQ server and the database servers we can start testing the setup. We do that by starting MaxScale:
sudo systemctl start maxscale
We can see the state of the two servers with MaxAdmin:
maxadmin list servers

Servers.
-------------------+-----------------+-------+-------------+--------------------
Server             | Address         | Port  | Connections | Status
-------------------+-----------------+-------+-------------+--------------------
production-1       | 192.168.0.200   |  3306 |           0 | Running
archive-1          | 192.168.0.201   |  3000 |           0 | Running
-------------------+-----------------+-------+-------------+--------------------
We can also check the queue status on the RabbitMQ server:
sudo rabbitmqctl list_queues

Listing queues ...
If we create a connection on the Production service on port 4000 and execute a set of data modifying statements we should see an equal number of statements being sent to the RabbitMQ server:
MariaDB [(none)]> insert into test.t1 values(1);
Query OK, 1 row affected (0.09 sec)

MariaDB [(none)]> insert into test.t1 values(2);
Query OK, 1 row affected (0.07 sec)

MariaDB [(none)]> update test.t1 set id = 0;
Query OK, 2 rows affected (0.05 sec)
Rows matched: 2  Changed: 2  Warnings: 0
On the RabbitMQ server we can see the new queue msg-queue-1 with three new messages in it.
sudo rabbitmqctl list_queues

Listing queues ...
msg-queue-1 3
We can also see the data on the archive server:
MariaDB [(none)]> select * from test.t1;
+------+
| id   |
+------+
|    0 |
|    0 |
+------+
2 rows in set (0.00 sec)
To read the data from the RabbitMQ, we can use the RabbitMQ Consumer tool included in the MaxScale source. For a tutorial on how to use this tool, please read RabbitMQ Consumer Client.
