
This blog post will show how to Install MaxScale and MariaDB 5.5 Galera Cluster with Severalnines Cluster Control on Amazon Virtual Private Cloud.
The steps in this blog
Step 1. How to setup Amazon Virtual Private Cloud Step 2. How to prepare the MariaDB Galera Cluster nodes and to set the subnet routings Step 3. How to install MariaDB Galera 3 node cluster in the private subnet of an AWS VPC using Severalnines Cluster Control Step 4. How to build MaxScale from git source on the Cluster Control node
Components in this High Available set up
- MariaDB Galera Cluster is a synchronous multi-master cluster for MariaDB
- Cluster Control makes managing your MariaDB Galera Cluster easier
- MaxScale makes load balancing and other flexible customisation possible
Step 1. How to setup Amazon Virtual Private Cloud
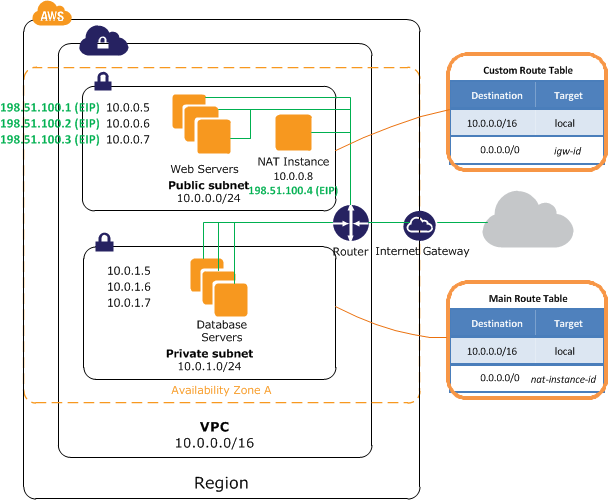
We will set up AWS according to Scenario 2: “VPC with Public and Private Subnets” described in the Amazon VPC User Guide. This scenario is recommended “if you want to run a public-facing web application, while maintaining back-end servers that aren’t publicly accessible.”
Why do we want to set up two subnets?
Check the picture bellow. In general the MariaDB Galera nodes will be in the Private subnet, totally isolated. We will install the S9 Cluster Control node and will assign it an Elastic IP for that example, but in general you should setup a private VPN gateway and to deassociate the Elastic IP from the Cluster Control. I might explain in other blog how to setup simple strongswan gateway with Elastic IP, in a view to get full control and to avoid the payments for the AWS VPN gateways
Use the following process to implement scenario 2
To implement scenario 2 using the VPC wizard
- Open the Amazon VPC console at https://console.aws.amazon.com/vpc/.
- In the navigation pane, click VPC Dashboard.
- Locate the Your Virtual Private Cloud area of the dashboard and click Get started creating a VPC, if you have no VPC resources, or click Start VPC Wizard.
- Select the second option, VPC with Public and Private Subnets, and then click Select.
- Verify the information on the confirmation page. Make any changes that you need, and then click Create VPC to create your VPC, subnets, Internet gateway, and route tables, and launch a NAT instance into the public subnet.
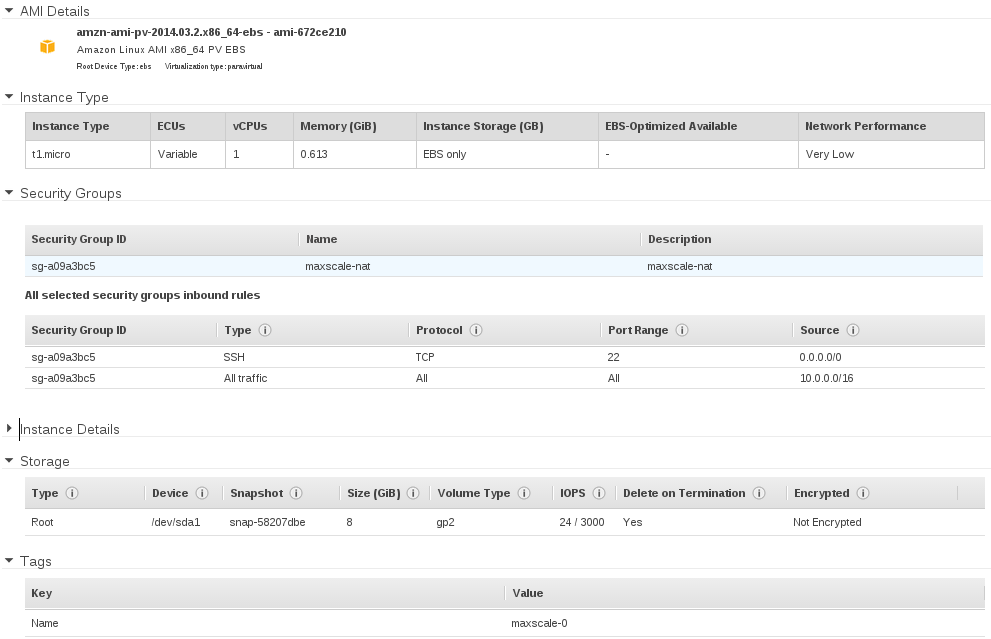
Now, create new AWS VPC security group. In general its good to separate the groups per service, like SSH group, MaxScale group, MySQL group etc
To create the new security group named maxscale-nat for the NAT instance
- Open the Amazon VPC console at https://console.aws.amazon.com/vpc/.
- In the navigation pane, click Security Groups.
- Click the Create Security Group button.
- In the Create Security Group dialog box, specify maxscale-nat as the name of the security group, and provide a description. Select the ID of your VPC from the VPC list, and then click Yes, Create.
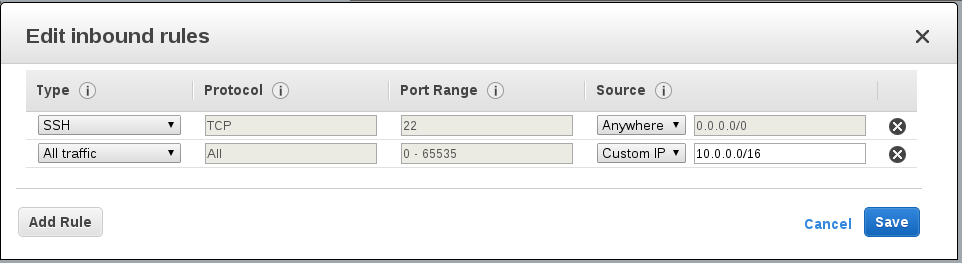
To add rules to the maxscale-nat security group
- Select the maxscale-nat security group that you created. The details pane displays the details for the security group, plus tabs for working with its inbound and outbound rules.
- On the Inbound Rules tab, click Edit and add rules for inbound traffic as follows:
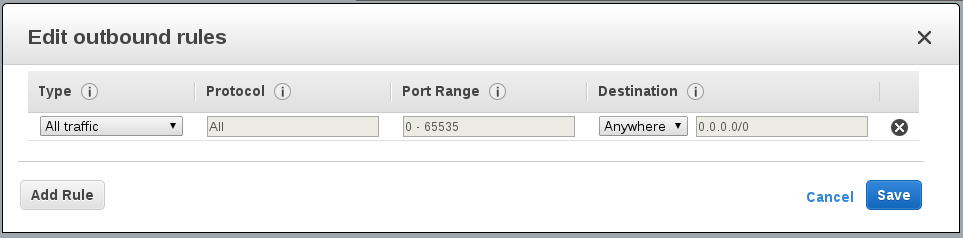
- On the Outbound Rules tab, click Edit and add rules for outbound traffic as follows:
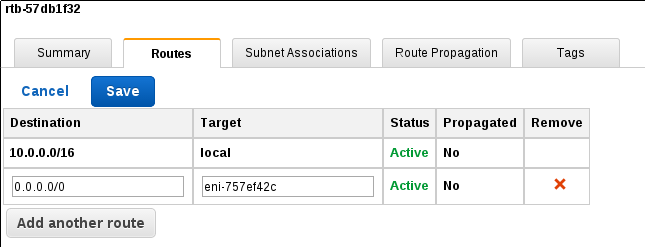
Setting the NAT routing
Follow the explanation at http://docs.aws.amazon.com/AmazonVPC/latest/UserGuide/VPC_Scenario2.html…
You already have the NAT instance created by the Start VPC Wizard
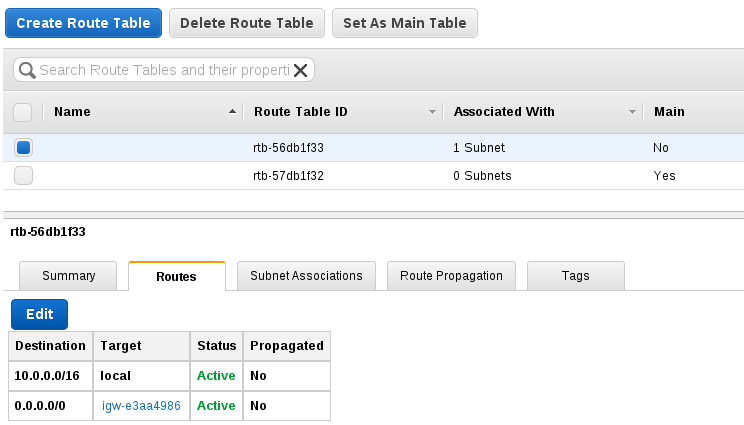
Go to VPC Route tables at https://console.aws.amazon.com/vpc/
Main Route Table
The first row describes the entry for local routing in the VPC; this entry enables the instances in the VPC to communicate with each other. The second row describes the entry that sends all other subnet traffic to the NAT instance (i-e1bdf1a3) , which is specified using its AWS-assigned identifiers (for example, network interface eni-757ef42c and instance i-e1bdf1a3).
Custom Route Table
The first row describes the entry for local routing in the VPC; this entry enables the instances in this VPC to communicate with each other. The second row describes the entry for routing all other subnet traffic to the Internet over the Internet gateway, which is specified using its AWS-assigned identifier (for example, igw-1a2b3d4d).
Step 2. How to prepare the MariaDB Galera cluster nodes and to set the subnet routings
Create the 3 nodes for the MariaDB galera cluster
This is the usual EC2 instance create sequence, you just create them in the EC2-VPC at the 10.0.0.0/24 subnet and use the maxscale-nat security group.
Set some easy VPC IPs like 10.0.0.10, 10.0.0.11, 10.0.0.12. You may set one node, update it, set the SSH keyless user, then create AMI image and to deploy two more identical ones based on that AMI.
OR, you may deploy three nodes with identical settings .. this is your choice:
Access to the VPC nodes
Now, once you get the running, they will be isolated, the only way to get at them is to use the NAT instance.
You will need Elastic IP, associate one via the EC2 Elastic IP dialog:
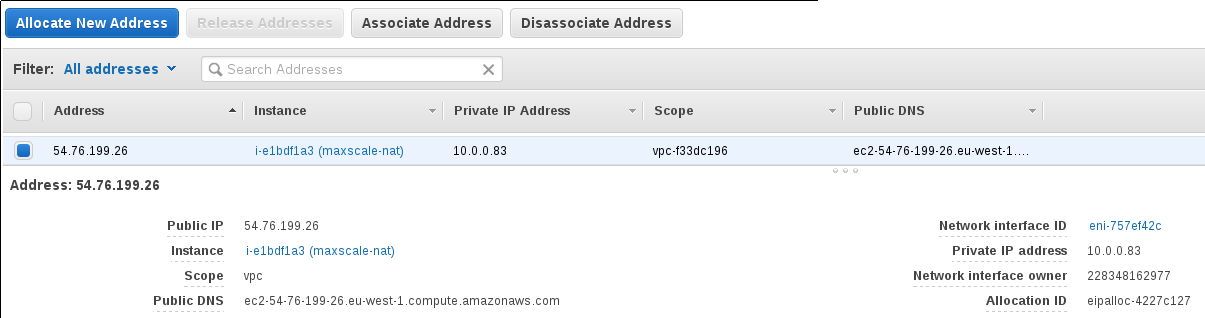
Now you will be able to access the NAT instance at its public IP via SSH, and from there to connect to the rest of the nodes via their VPC IPs.
Anyway, there is a problem with these nodes, they have to be configured to use the NAT interface to access the Internet, in a view to access the repos and the AWS updates. In general all you need is to change the routes and to make them permament:
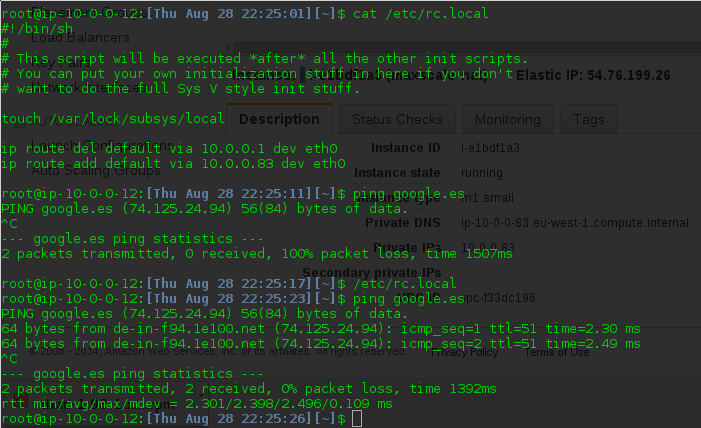
At the /etc/rc.local you should add the following lines:
ip route del default via 10.0.0.1 dev eth0
ip route add default via 10.0.0.83 dev eth0
as the 10.0.0.83 is the VPC IP of the NAT instance.
Now, you may connect to each node and update the software:
$ yum update -y
Step 3. How to install MariaDB galera 3 node cluster in the private subnet of an AWS VPC using the Severalnines Cluster Control
There is an online configurator for the Severalnines Cluster Control installation script at http://www.severalnines.com/New-Galera-Configurator/index.html
All you need is to fill up the info and you will be provided with download link at the email provided:
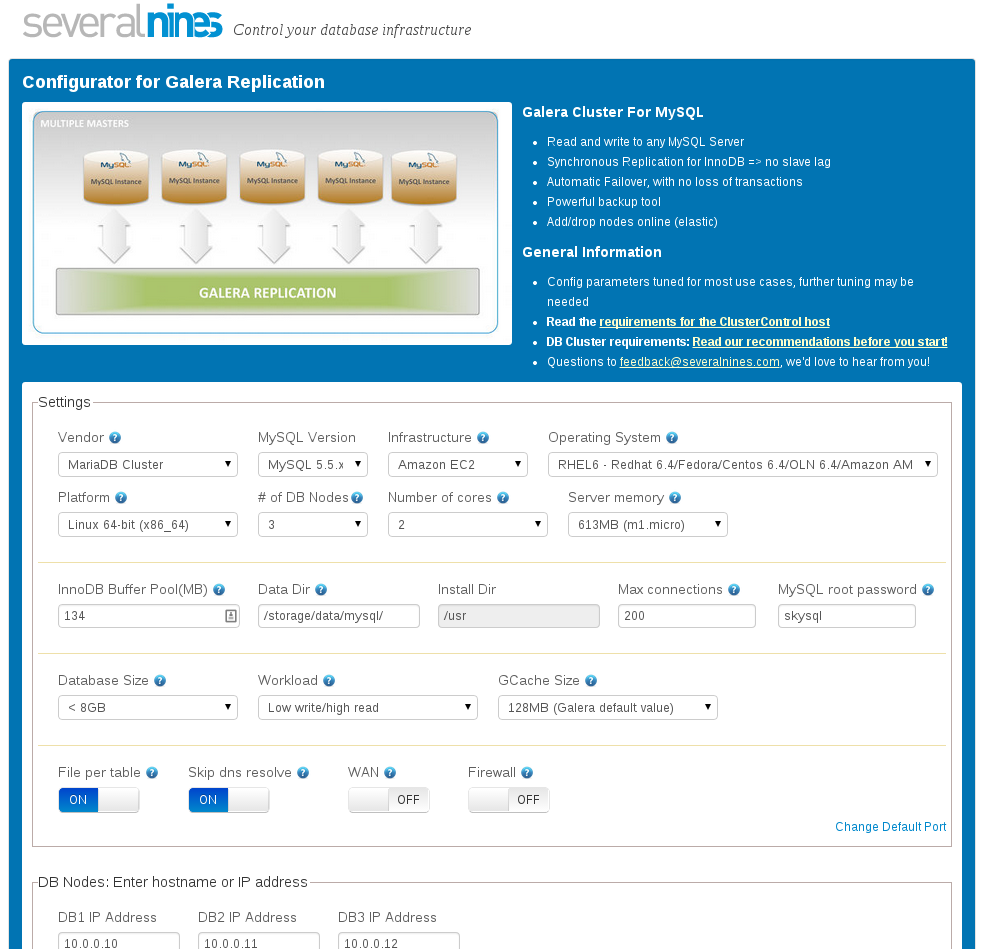
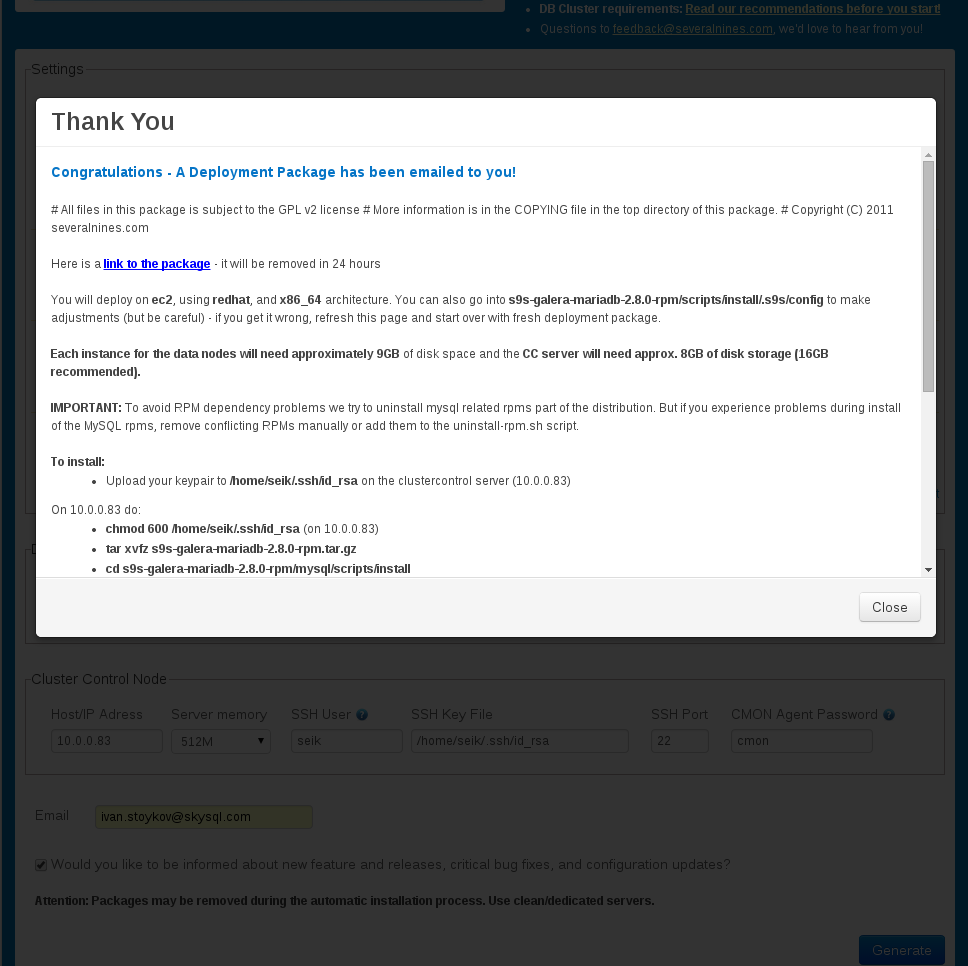
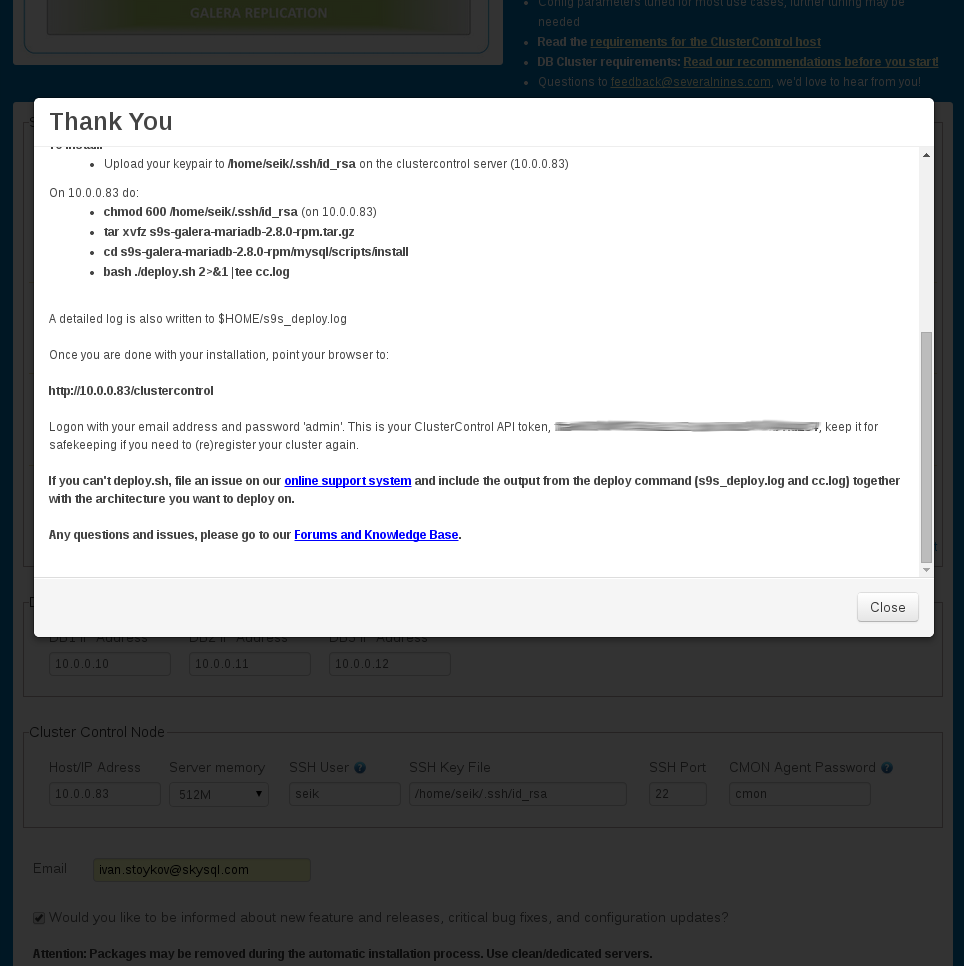
At the end of the configuration process you will get a popup window with the download link of the installation script along with the instructions. The same information will be sent by email too:
Installing MariaDB Galera cluster with Severalnines Cluster Control
At the NAT instance /in this case 10.0.0.83/ , you will have to setup sudo ssh user which should has a passwordless /sshkey/ access to all the three internal nodes, again preferably with sudo rights. I will not describe how to do this here.
Download and execute the S9 installation script:
seik@ip-10-0-0-83:[Thu Aug 28 23:42:02][~]$ cd s9s.install.script/
seik@ip-10-0-0-83:[Thu Aug 28 23:42:03][~/s9s.install.script]$
seik@ip-10-0-0-83:[Thu Aug 28 23:42:08][~/s9s.install.script]$ ls
s9s-galera-mariadb-2.8.0-rpm.tar.gz
seik@ip-10-0-0-83:[Thu Aug 28 23:43:20][~/s9s.install.script]$ tar xvf s9s-galera-mariadb-2.8.0-rpm.tar.gz
seik@ip-10-0-0-83:[Thu Aug 28 23:43:25][~/s9s.install.script]$ cd s9s-galera-mariadb-2.8.0-rpm
seik@ip-10-0-0-83:[Thu Aug 28 23:43:27][~/s9s.install.script/s9s-galera-mariadb-2.8.0-rpm]$ cd mysql/scripts/install/
seik@ip-10-0-0-83:[Thu Aug 28 23:43:47][~/s9s.install.script/s9s-galera-mariadb-2.8.0-rpm/mysql/scripts/install]$ bash ./deploy.sh 2>&1 |tee cc.log
Checking EC2 Keypair:
Key pair found
Firewalls must accept  4567 (galera), 4567+1 (galera IST),  22 (ssh),  (rsync), 3306 (mysql), ping (icmp).
**** firewall will be disabled! (change in .s9s/config)
..
...
Note the Firewall, at the VPC you dont need firewall and its not enabled at the VPC Galera nodes.
The installation process will take some time, and you will be asked some questions like about disabling selinux
At the end you will get the ClusterControl API token and the clustercontrol URL with the login instructions:
Complete!
Installing ClusterControl UI in /var/www/html//clustercontrol on 10.0.0.83
Stopping httpd:                                            [FAILED]
Starting httpd: httpd:                                     [  OK  ]
Installing /etc/init.d/cmon on 10.0.0.83
Starting cmon  :Going to daemonize.. - cmon will write a log in /var/log/cmon.log from now
Starting cmon  : ok
Loaded plugins: priorities, update-motd, upgrade-helper
2 packages excluded due to repository priority protections
Package cronie-1.4.4-12.6.amzn1.x86_64 already installed and latest version
Nothing to do
** Configuring Controller Completed
Starting cmon  :Going to daemonize.. - cmon will write a log in /var/log/cmon.log from now
Starting cmon  : ok
galera : 10.0.0.10  [  up]
galera : 10.0.0.11  [  up]
galera : 10.0.0.12  [  up]
Installation completed in 765 seconds
*******************************************************************************
*                                                                             *
*                            CONGRATULATIONS                                  *
*                                                                             *
*******************************************************************************
You have now installed one of the most advanced db infrastructures available.

Open your browser to http://10.0.0.83/clustercontrol
Logon with your email address and password 'admin'.
This is your ClusterControl API token, xxx,
keep it for safekeeping if you need to (re)register your cluster again.

Don't hesitate to contact us if you have any problems or inquiries. Good luck,
Severalnines AB
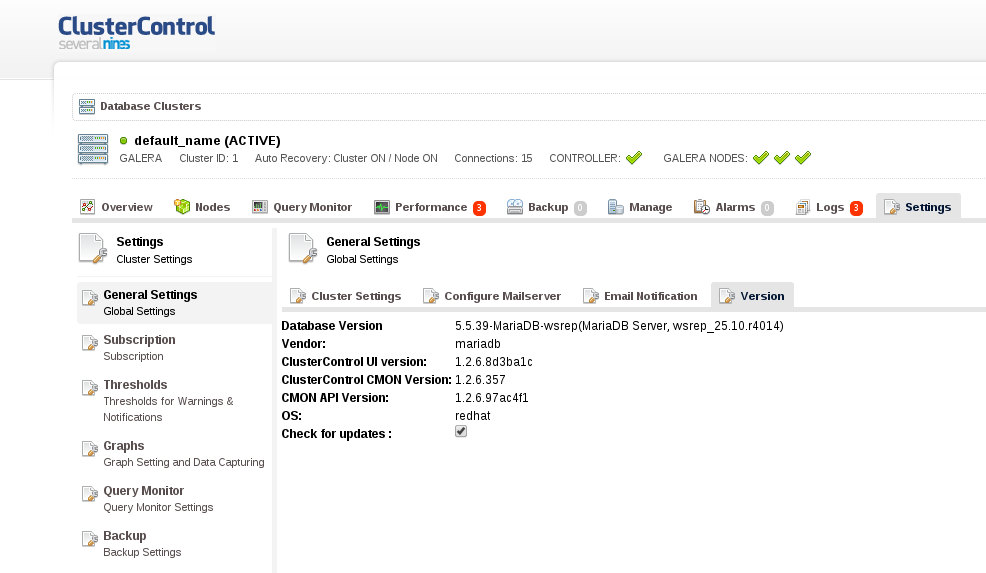
Step 4. How to build MaxScale from git source at the Cluser Control node
You will now have installed the Cluster Control at the NAT VPC node:
First off all, check the README at https://github.com/skysql/MaxScale
Note, you will need to prepare the NAT node about the compile process, but I will go through that step by step with the common errors that might occur:
So, first step, after reading the README, you will get to the section Building MaxScale.
Edit the file build_gateway.inc in your MaxScale directory
So what to do ? Get the git source:
seik@ip-10-0-0-83:[Fri Aug 29 00:47:08][~]$ git clone https://github.com/skysql/MaxScale.git
-bash: git: command not found
seik@ip-10-0-0-83:[Fri Aug 29 00:47:31][~]$ sudo yum install git
.
..
Installed:
  git.x86_64 0:1.8.3.1-2.37.amzn1
Complete!
seik@ip-10-0-0-83:[Fri Aug 29 00:47:47][~]$ git clone https://github.com/skysql/MaxScale.git
Cloning into 'MaxScale'...
remote: Counting objects: 10346, done.
remote: Total 10346 (delta 0), reused 0 (delta 0)
Receiving objects: 100% (10346/10346), 30.36 MiB | 2.20 MiB/s, done.
Resolving deltas: 100% (7444/7444), done.
seik@ip-10-0-0-83:[Fri Aug 29 00:48:26][~]$
seik@ip-10-0-0-83:[Fri Aug 29 00:49:13][~]$ ls -lrth
total 1.4M
drwxrwxr-x  3 seik seik 4.0K Aug 28 23:43 s9s.install.script
-rw-rw-r--  1 seik seik 1.4M Aug 28 23:55 s9s_deploy.log
drwxr-xr-x  3 seik seik 4.0K Aug 28 23:56 s9s_tmp
drwxrwxr-x 15 seik seik 4.0K Aug 29 00:48 MaxScale
We have now the source, after installing the git which was missing.
Now, accorind to the README, the MariaDB development packagre is needed:
Checking the local MariaDB install done by s9s script, its missing:
seik@ip-10-0-0-83:[Fri Aug 29 00:20:11][/etc/httpd/conf]$ sudo rpm -qa | grep -i maria
MariaDB-client-5.5.39-1.el6.x86_64
MariaDB-common-5.5.39-1.el6.x86_64
MariaDB-server-5.5.39-1.el6.x86_64
MariaDB-compat-5.5.39-1.el6.x86_64
seik@ip-10-0-0-83:[Fri Aug 29 00:39:28][/etc/httpd/conf]$ sudo yum search mariadb | grep -i devel
MariaDB-devel.x86_64 : MariaDB: a very fast and robust SQL database server
seik@ip-10-0-0-83:[Fri Aug 29 00:39:38][/etc/httpd/conf]$ sudo yum install MariaDB-devel
Loaded plugins: priorities, update-motd, upgrade-helper
amzn-main/latest
...
Installed:
  MariaDB-devel.x86_64 0:5.5.39-1.el6
Complete!

seik@ip-10-0-0-83:[Fri Aug 29 00:40:13][/etc/httpd/conf]$ sudo rpm -qa | grep -i maria
MariaDB-client-5.5.39-1.el6.x86_64
MariaDB-common-5.5.39-1.el6.x86_64
MariaDB-server-5.5.39-1.el6.x86_64
MariaDB-compat-5.5.39-1.el6.x86_64
MariaDB-devel-5.5.39-1.el6.x86_64
At the README is said that you might need to relocate the packages, but this is not needed in this case
The original build_gateway.inc looks like:
seik@ip-10-0-0-83:[Fri Aug 29 00:40:13][~/MaxScale/]$ cat build_gateway.inc  | grep -v "^#"

DEBUG :=

UNIX := Y

ROOT_PATH := $(HOME)/src/bazaar/tmp/maxscale

INC_PATH  := $(HOME)/usr/include
MYSQL_ROOT := $(INC_PATH)/mysql

MYSQL_HEADERS := -I$(INC_PATH) -I$(MYSQL_ROOT)/ -I$(MYSQL_ROOT)/private/ -I$(MYSQL_ROOT)/extra/

DYNLIB :=

EMBEDDED_LIB := $(HOME)/usr/lib64
ifdef DYNLIB
  EMBEDDED_LIB := $(HOME)/usr/lib64/dynlib
endif
ERRMSG := $(HOME)/usr/share/mysql
How to check the local inc and mysql root?
seik@ip-10-0-0-83:[Fri Aug 29 00:59:00][~]$ mysql_config --include
-I/usr/include/mysql
After setting the proper variables, the build_gateway.inc looks like:
seik@ip-10-0-0-83:[Fri Aug 29 00:59:56][~/MaxScale]$ cat build_gateway.inc  | grep -v "^#"

DEBUG :=

UNIX := Y

ROOT_PATH := $(HOME)/MaxScale

INC_PATH  := /usr/include
MYSQL_ROOT := $(INC_PATH)/mysql

MYSQL_HEADERS := -I$(INC_PATH) -I$(MYSQL_ROOT)/ -I$(MYSQL_ROOT)/private/ -I$(MYSQL_ROOT)/extra/

DYNLIB :=

EMBEDDED_LIB := /usr/lib64
ifdef DYNLIB
  EMBEDDED_LIB := /usr/lib64/dynlib
endif
ERRMSG := /usr/share/mysql
Checking the errmsg.sys:
seik@ip-10-0-0-83:[Fri Aug 29 01:08:30][/usr/lib]$ ls /usr/share/mysql/english/errmsg.sys
/usr/share/mysql/english/errmsg.sys
Try to execute make depend:
seik@ip-10-0-0-83:[Fri Aug 29 01:10:51][~/MaxScale]$ make depend
(cd log_manager; make depend)
make[1]: Entering directory `/home/seik/MaxScale/log_manager'
makefile:67: depend: No such file or directory
g++ -M  -Wall
	-I/usr/include -I/usr/include/mysql/ -I/usr/include/mysql/private/ -I/usr/include/mysql/extra/
	-I/home/seik/MaxScale/utils -I./
	log_manager.cc > depend
/bin/sh: g++: command not found
make[1]: *** [depend] Error 127
make[1]: Leaving directory `/home/seik/MaxScale/log_manager'
make: *** [depend] Error 2
We need to install the Development environment here:
seik@ip-10-0-0-83:[Fri Aug 29 01:11:20][~/MaxScale]$ sudo yum groupinstall 'Development Tools'
.
..
...
Complete!
seik@ip-10-0-0-83:[Fri Aug 29 01:14:49][~/MaxScale]$ make depend
..
...
../include/secrets.h:41:25: fatal error: openssl/aes.h: No such file or directory
..
compilation terminated.
make[2]: *** [depend] Error 1
make[2]: Leaving directory `/home/seik/MaxScale/server/core'
make[1]: *** [depend] Error 2
make[1]: Leaving directory `/home/seik/MaxScale/server'
make: *** [depend] Error 2
Here you have to install ssl-devel:
seik@ip-10-0-0-83:[Fri Aug 29 01:15:51][~/MaxScale]$ sudo yum install openssl-devel  -y
.
..
...
Installed:
  openssl-devel.x86_64 1:1.0.1i-1.78.amzn1
Complete!
seik@ip-10-0-0-83:[Fri Aug 29 01:16:16][~/MaxScale]$ make depend
.
..
...
make[1]: Leaving directory `/home/seik/MaxScale/client'
Now to execute make:
seik@ip-10-0-0-83:[Fri Aug 29 01:16:39][~/MaxScale]$ make
.
..
...
/usr/bin/ld: cannot find -laio
collect2: error: ld returned 1 exit status
make[2]: *** [maxscale] Error 1
make[2]: Leaving directory `/home/seik/MaxScale/server/core'
make[1]: *** [all] Error 2
make[1]: Leaving directory `/home/seik/MaxScale/server'
make: *** [all] Error 2
Here you have to install libaio-devel as said at the end of the README:
seik@ip-10-0-0-83:[Fri Aug 29 01:18:05][~/MaxScale]$ sudo yum install libaio libaio-devel
Loaded plugins: priorities, update-motd, upgrade-helper
..
...
....
Installed:
  libaio-devel.x86_64
Complete!
Now to execute make, again:
seik@ip-10-0-0-83:[Fri Aug 29 01:18:33][~/MaxScale]$ make
.
..
...
cc -ldl maxadmin.o  -o maxadmin
make[1]: Leaving directory `/home/seik/MaxScale/client'
Now to execute make install:
seik@ip-10-0-0-83:[Fri Aug 29 01:19:04][~/MaxScale]$ make install
(cd server; make DEST=/home/seik/usr/local/skysql install)
make[1]: Entering directory `/home/seik/MaxScale/server'
install -b MaxScale_template.cnf /home/seik/usr/local/skysql/etc
install ../Documentation/*.pdf /home/seik/usr/local/skysql/Documentation
(cd core; make DEST=/home/seik/usr/local/skysql install)
make[2]: Entering directory `/home/seik/MaxScale/server/core'
install -D maxscale maxkeys maxpasswd  /home/seik/usr/local/skysql/bin
install -D /usr/lib64/libmysqld.a /home/seik/usr/local/skysql/lib
install -D /usr/share/mysql/errmsg.sys /home/seik/usr/local/skysql/mysql
install: cannot stat ‘/usr/share/mysql/errmsg.sys’: No such file or directory
make[2]: *** [install] Error 1
make[2]: Leaving directory `/home/seik/MaxScale/server/core'
make[1]: *** [install] Error 2
make[1]: Leaving directory `/h
Fix the errmsg.sys issue:
seik@ip-10-0-0-83:[Fri Aug 29 01:21:18][~/MaxScale]$ sudo ln -s /usr/share/mysql/english/errmsg.sys /usr/share/mysql/errmsg.sys
Now to execute make install, again:
seik@ip-10-0-0-83:[Fri Aug 29 01:21:23][~/MaxScale]$ make install
(cd server; make DEST=/home/seik/usr/local/skysql install)
make[1]: Entering directory `/home/seik/MaxScale/server'
install -b MaxScale_template.cnf /home/seik/usr/local/skysql/etc
.
..
...
make[1]: Leaving directory `/home/seik/MaxScale/query_classifier'
(cd client; make DEST=/home/seik/usr/local/skysql install)
make[1]: Entering directory `/home/seik/MaxScale/client'
install -D maxadmin /home/seik/usr/local/skysql/bin
make[1]: Leaving directory `/home/seik/MaxScale/client'
seik@ip-10-0-0-83:[Fri Aug 29 01:21:34][~/MaxScale]$
Now execute make documentation and at the end of the build, you will have the documentation at ~/usr/local/skysql/Documentation:
seik@ip-10-0-0-83:[Fri Aug 29 15:48:41][~/usr/local/skysql/Documentation]$ ls -la
total 1696
drwxrwxr-x 2 seik seik   4096 Aug 29 01:21 .
drwxrwxr-x 9 seik seik   4096 Aug 29 01:20 ..
-rwxr-xr-x 1 seik seik 381965 Aug 29 01:21 Debug And Diagnostic Support.pdf
-rwxr-xr-x 1 seik seik 444441 Aug 29 01:21 MaxAdmin The MaxScale Administration And Monitoring Client.pdf
-rwxr-xr-x 1 seik seik 134440 Aug 29 01:21 MaxScale 1.0beta Release Notes.pdf
-rwxr-xr-x 1 seik seik 526773 Aug 29 01:21 MaxScale Configuration And Usage Scenarios.pdf
-rwxr-xr-x 1 seik seik 232241 Aug 29 01:21 MaxScale HA with Corosync and Pacemaker.pdf
Now its matter of reading, testing and asking questions 🙂