
Set up a 3-Node MariaDB Cluster with HA Proxy on VirtualBox
This is a blog post series on setting up a 3-node MariaDB Enterprise Cluster with HA Proxy on VirtualBox. In this first part we will set up a virtual machine template using Oracle VirtualBox.
Let’s get started
To begin, you will need the following software:
- CentOS 6.5 (CentOS-6.5-x86_64-minimal.iso) – download here
- Oracle VirtualBox (4.3.10) – download here
Install VirtualBox. For this tutorial, we will be using VirtualBox on Mac OSX. Your views/screens may look different.
Now that you have obtained the required software (and installed VirtualBox), let’s set up a virtual machine to use as a template for future machines.
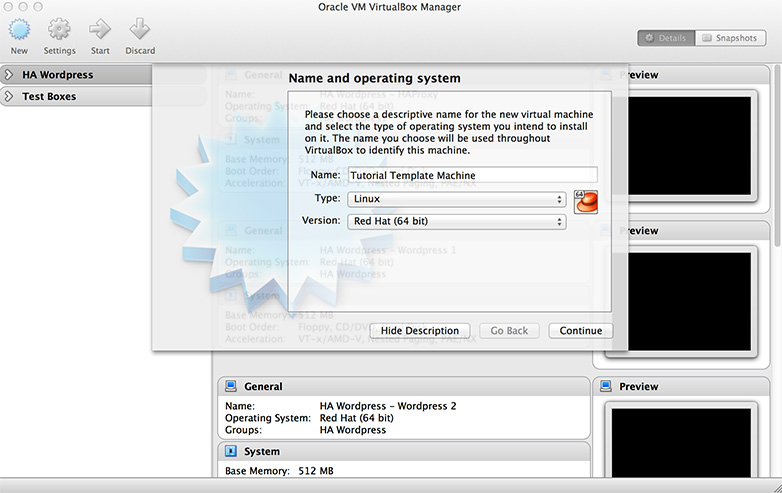
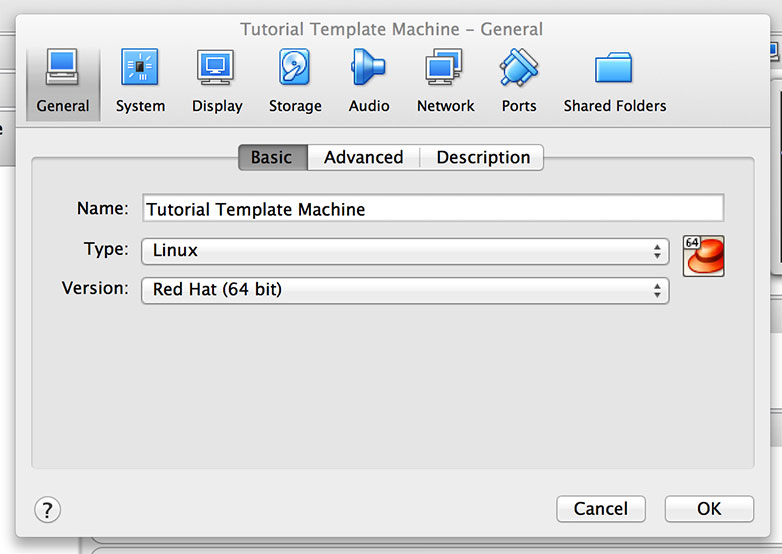
Click the “New” button in the upper left window of VirtualBox. In the pop-up window, enter the information for Name (I used Tutorial Template Machine), Type (Linux), and Version (Red Hat 64-bit). Click “Continue”.
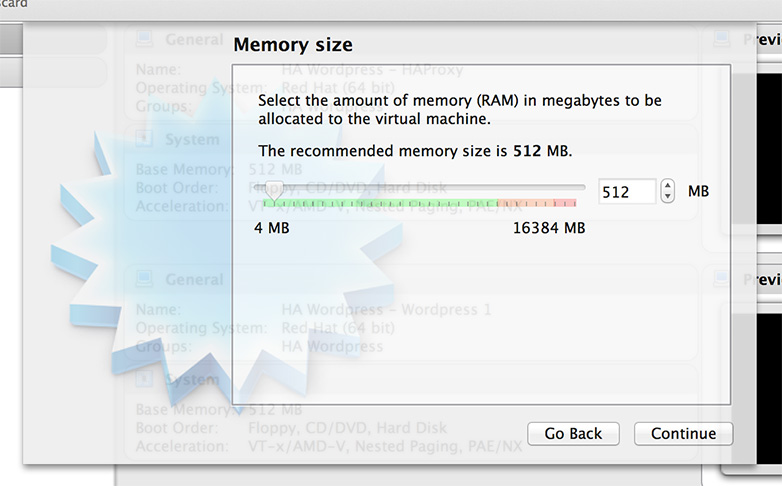
The next screen allows us to setup the memory for the virtual machine. For this tutorial, I’m using 512MB of RAM. Click “Continue”.
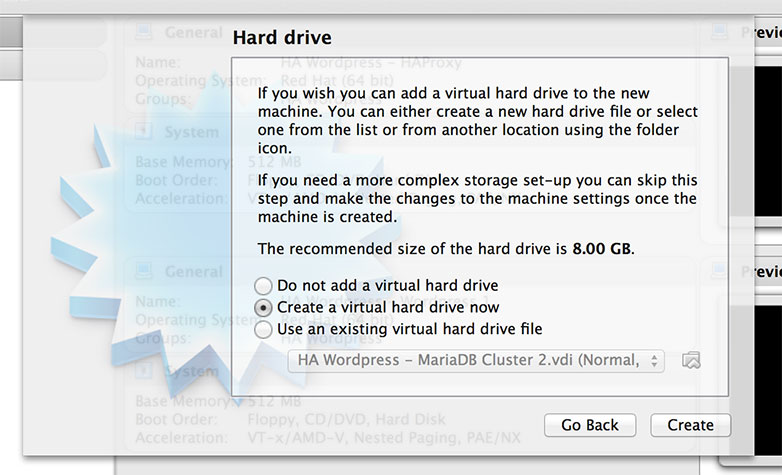
Next up is creating the hard drive. Click the radio button for “Create a virtual hard drive now”, then click “Create”.
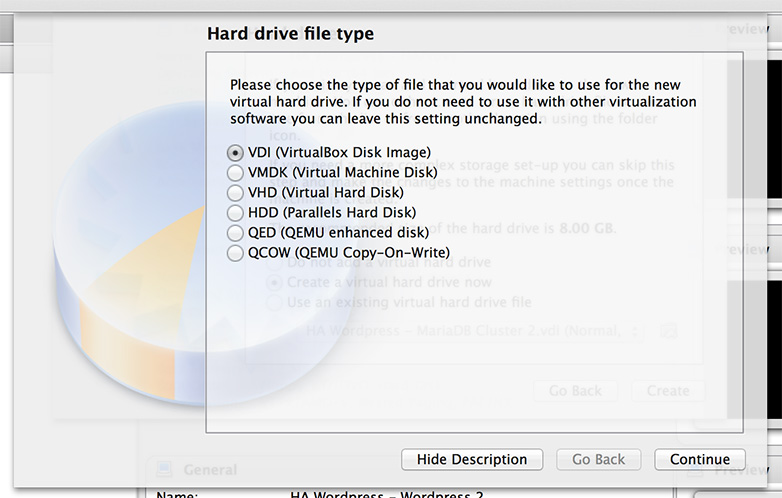
The next screen prompts for hard drive file type. Choose “VDI (VirtualBox Disk Image)”. Click “Continue”.
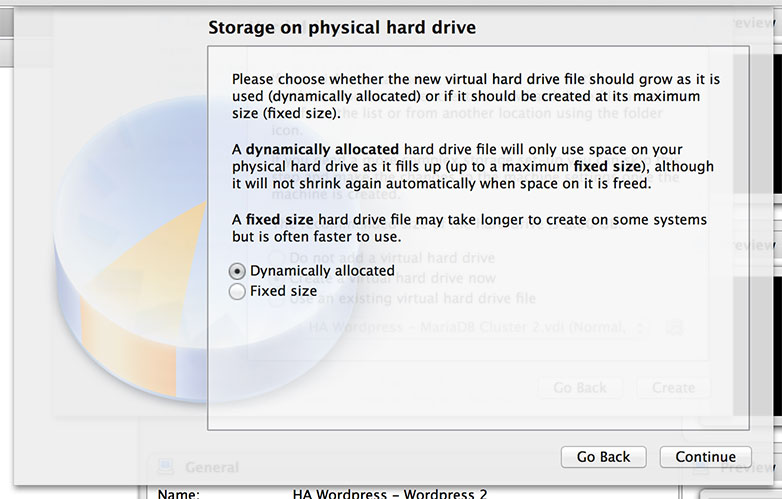
Next is choosing “Dynamically allocated” or “Fixed size” for the storage type. For this I’ve chosen dynamic, although you may seen better performance with fixed. For this tutorial dynamic is sufficient. Click “Continue”.
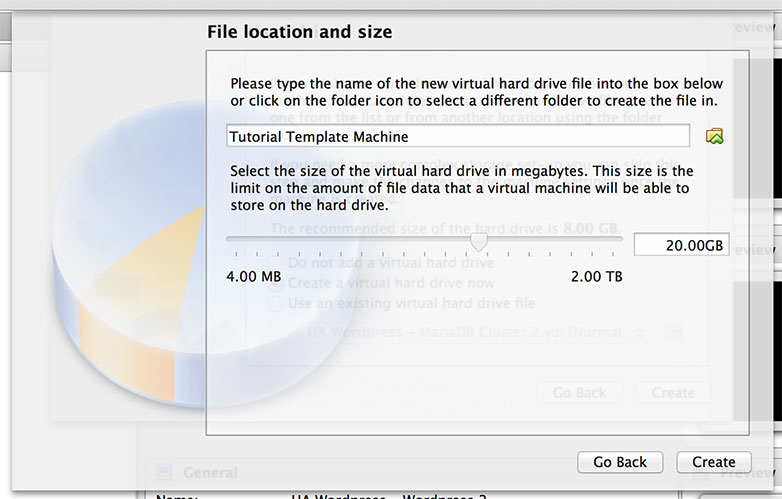
Now we name our new virtual hard drive and set it’s maximum size limit. I chosen to name this one “Tutorial Template Machine” with a size limit of 20.00 GB. Click “Create”.
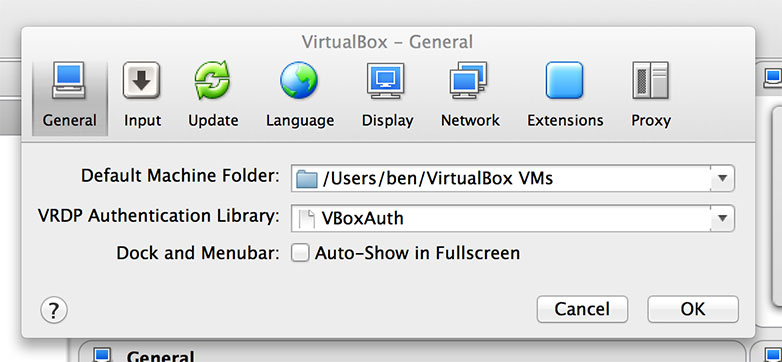
You should now see the newly created virtual machine in the left column of the Oracle VM VirtualBox Manager window, and it should say “Powered Off” below it’s name. Now go to the VirtualBox preferences. On Mac OSX, this is done by clicking “VirtualBox” in the menu bar and selecting “Preferences”. You should see the preferences window.
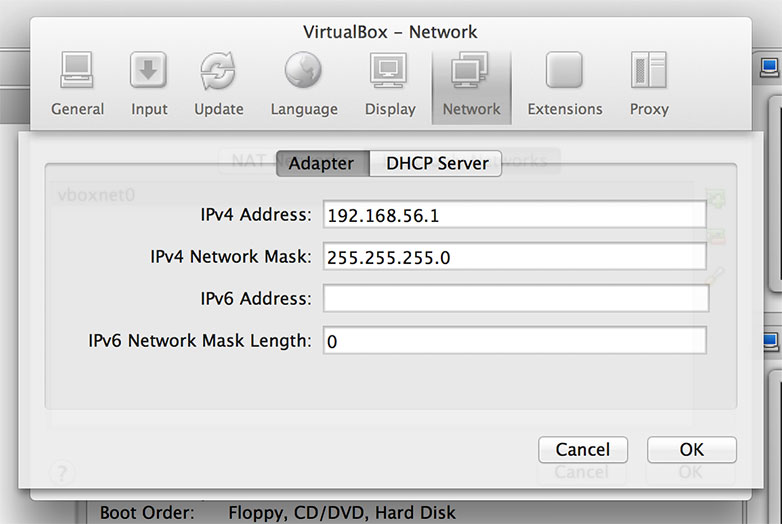
From here, click on the “Network” tab, then the “Host-only Networks” tab. Now click on the icon on the right side that looks like a network interface card with a plus sign on it. You’ll see vboxnet0 appear in the window. Select it, and click the icon on the right side that looks like a screwdriver.
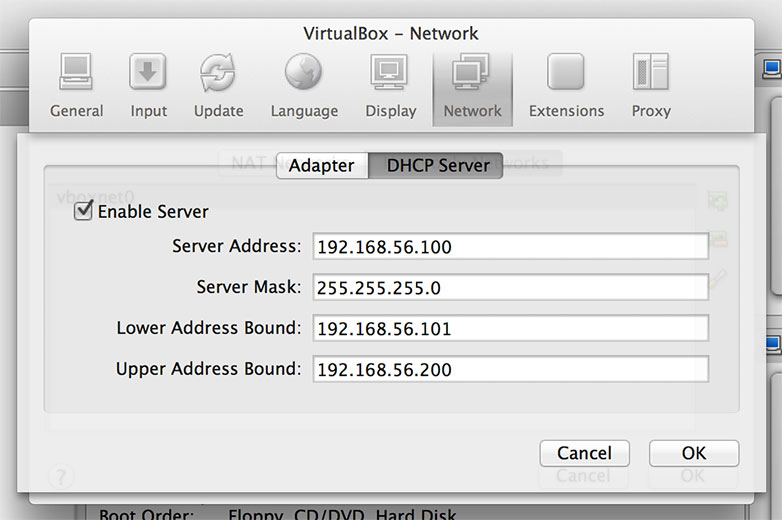
The IPv4 Address and IPv4 Network Mask fields should already be populated. The defaults are fine. Now click the “DHCP Server” tab. Check the box to “Enable Server”, fill in the fields, and click “OK”. Click “OK” again to exit out of the preferences.
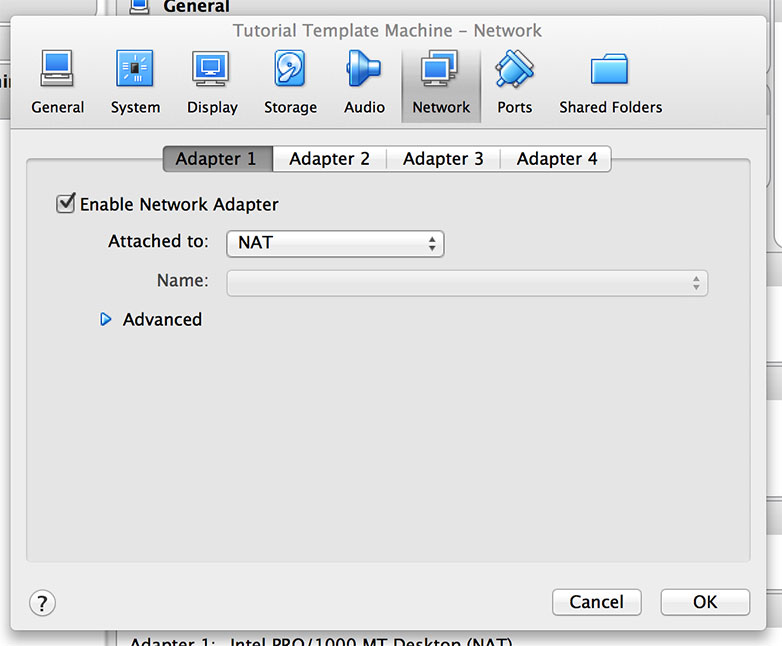
You should now be back at the main Oracle VM VirtualBox Manager screen. Select your newly created virtual machine from the left side, and click the “Settings” button (looks like a gear) towards the upper left of the window. The settings window for that virtual machine should now be open.
Here you can modify the settings of the virtual machine. We are going to setup the network and attach the CentOS iso image as a virtual CD-ROM drive. First the network. Click the “Network” tab.
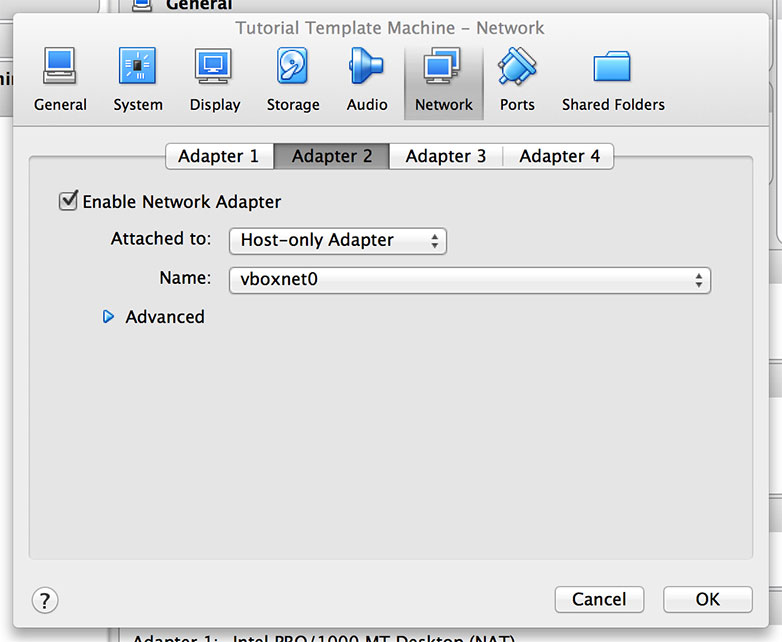
From here, click “Adapter 2”. Click the box to “Enable Network Adapter”. Set “Attached to” to “Host-only Adapter”. For “Name”, choose the newly created network. In this case, “vboxnet0”.
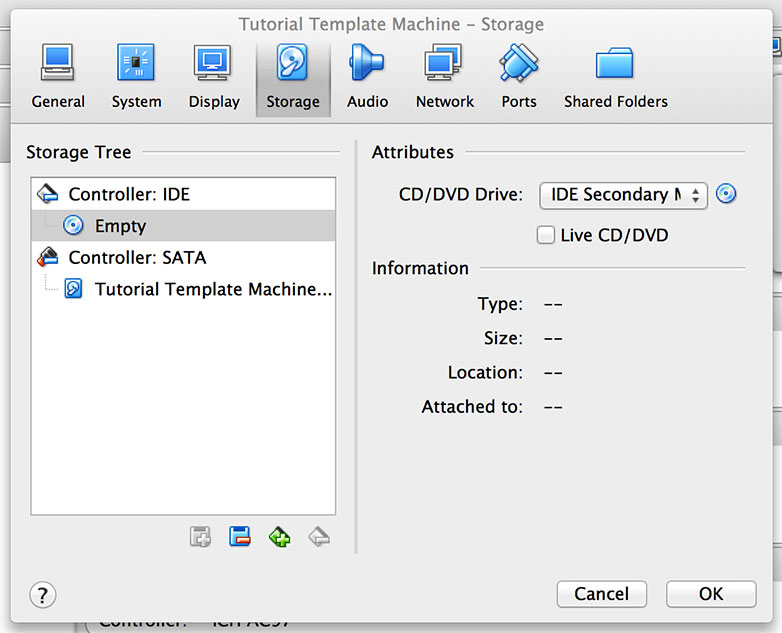
Now click the “Storage” tab. Here you should see a list of controllers. Under “Controller: IDE”, you should see “Empty”. Click it.
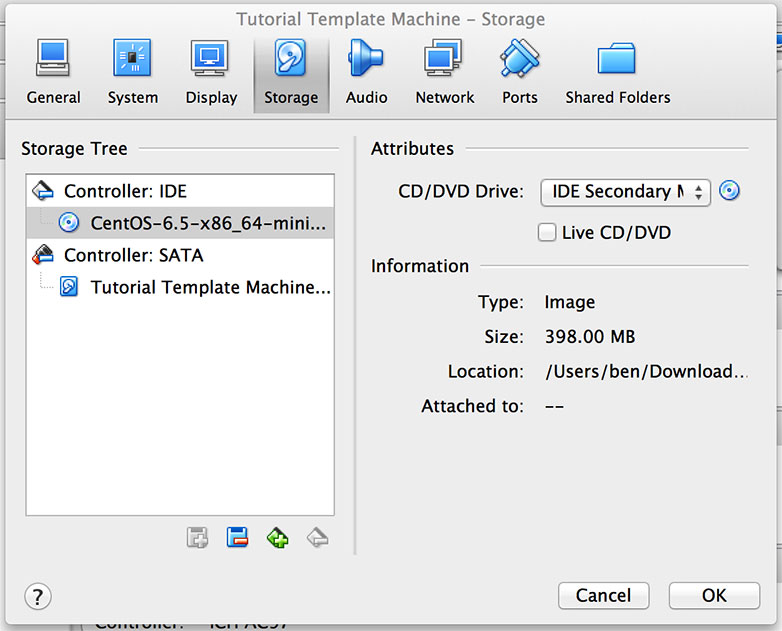
Now on the right side next to the CD/DVD Drive drop down, you should see a CD icon. Click it, and select “Choose a virtual CD/DVD disk file…” from the menu. Navigate to the Centos ISO file (CentOS-6.5-x86_64-minimal.iso) and click OK. You should now see the following screen with the CentOS disk image listed as a virtual drive. Click okay to close out of the settings.
You now should be back at the Oracle VM VirutalBox Manager main screen. Make sure your new virtual machine is selected in the left column, and click the Start button towards the upper left (green arrow pointing right). A new window will appear, and will show the virtual machine booting to the virtual CD we attached. You should now be at the boot menu for CentOS 6.5.
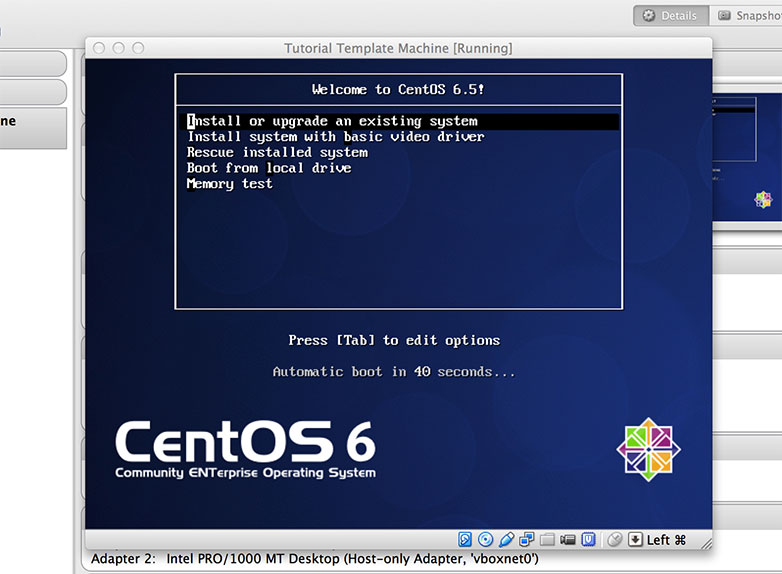
Highlight the option named “Install or upgrade an existing system” and click Enter/Return. After a moment, the following screen should appear allowing you to choose whether or not to test the media. For this tutorial I chose to skip.

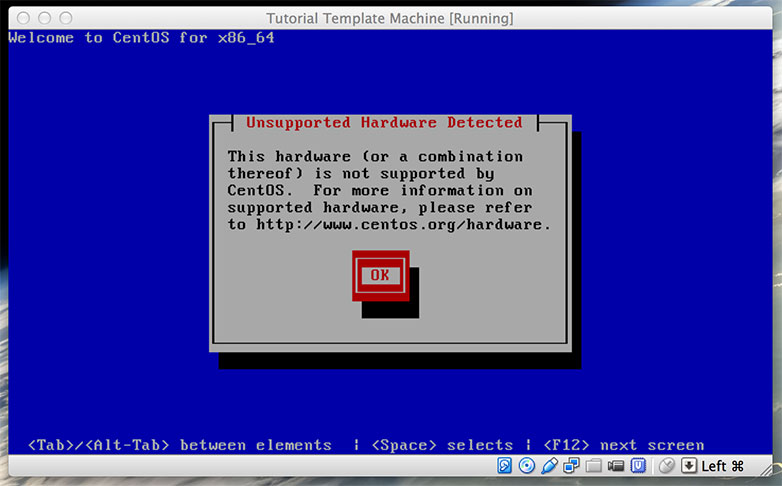
If the follow error about incompatiblehardware appears, select OK and continue as normal.
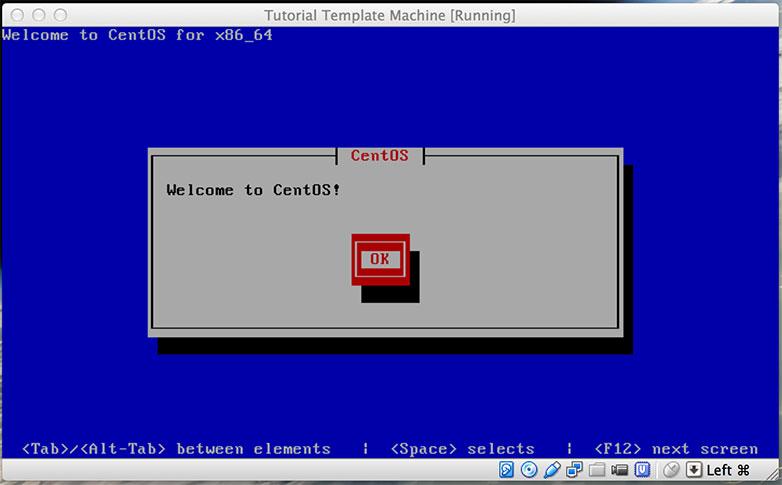
The next screen you should see says “Welcome to CentOS!”. Select OK to continue.
Next up is choosing your language.

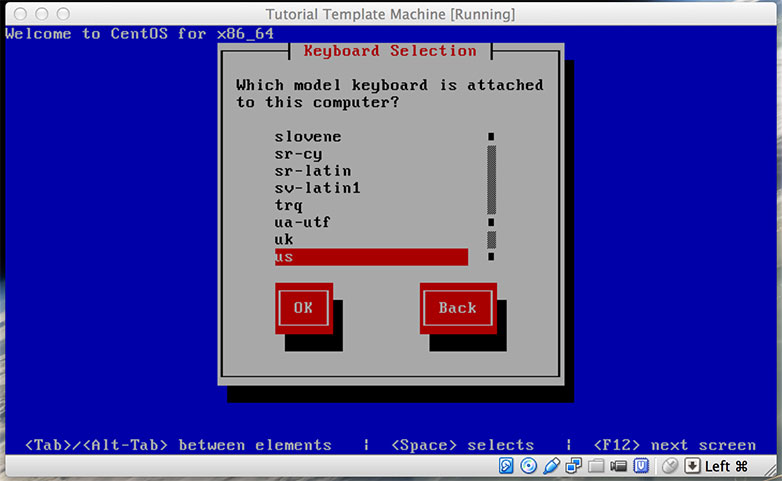
Next is keyboard selection.
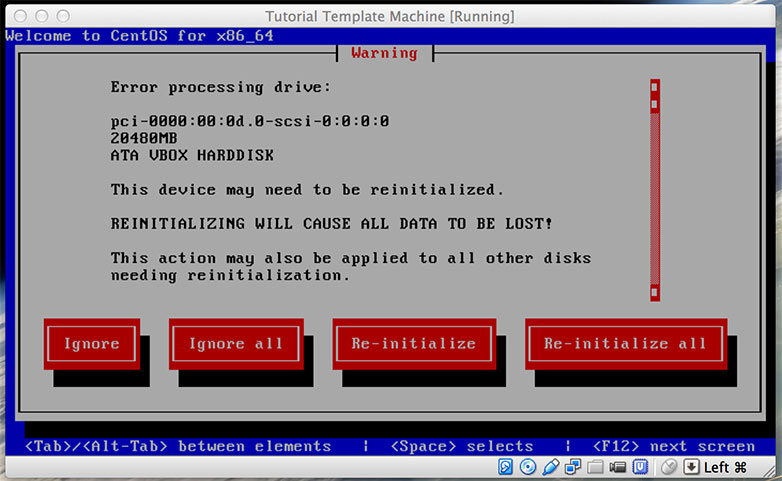
Next is a warning screen informing us there was an error trying to process the drive. It needs initialized. Select Re-initialize.
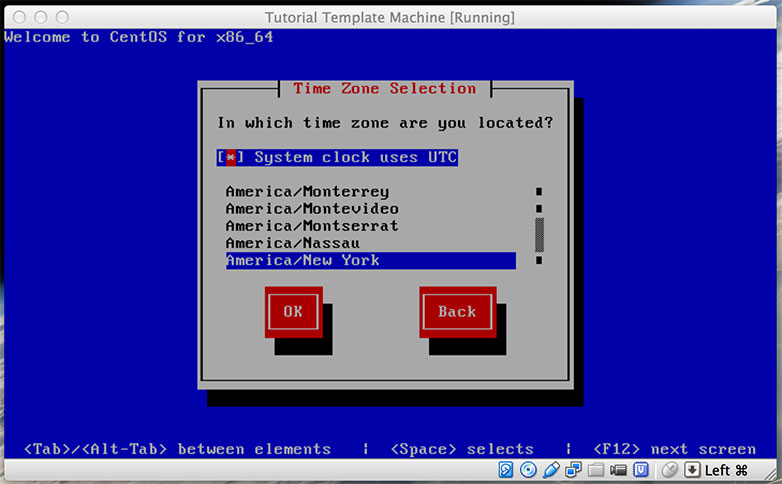
Next select your timezone.
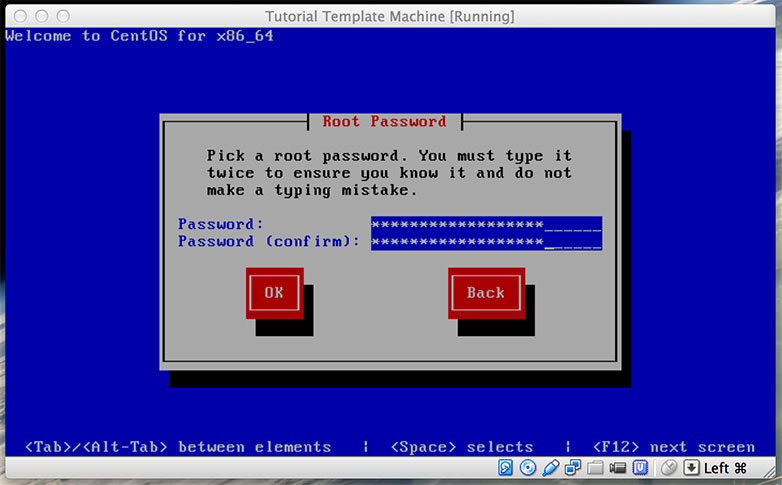
Next, set the root user password.
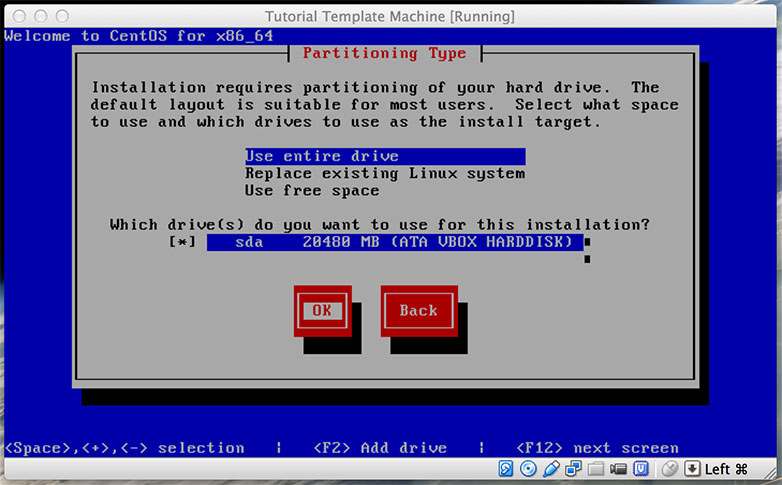
Next is partitioning the drive. Choose “Use entire drive”, and confirm the ATA VBOX HARDDISK is selected (should be only drive listed).
At the prompt, select “Write changes to disk”.

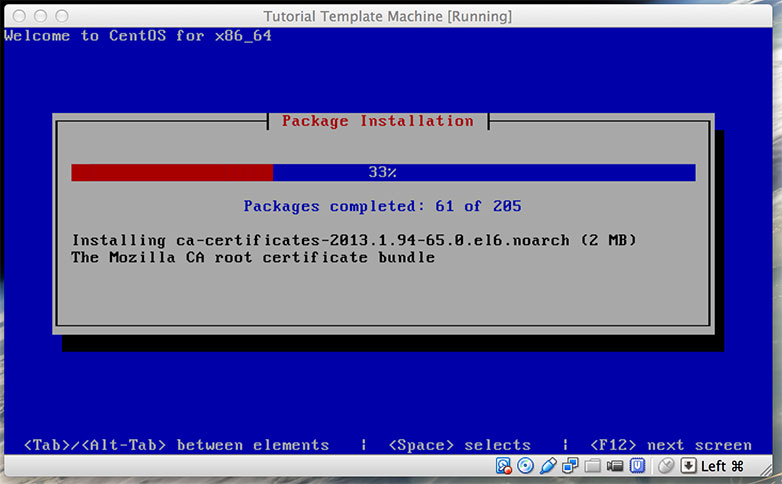
You should now see the installer running.
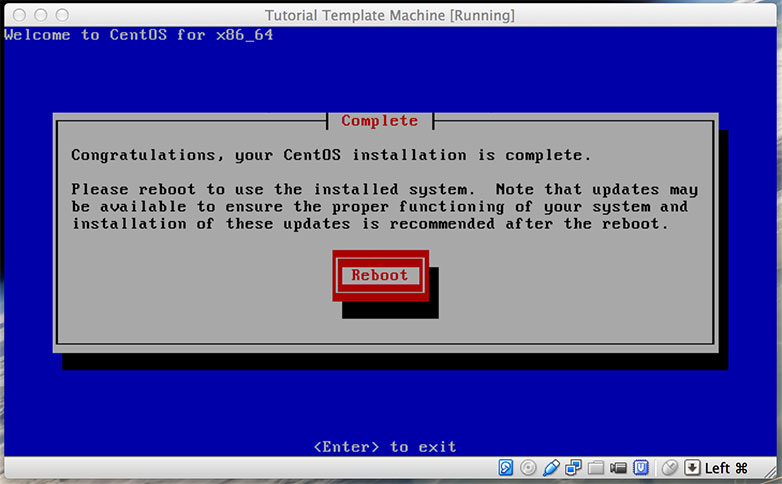
Now CentOS is installed, and the virtual machine is ready to reboot.
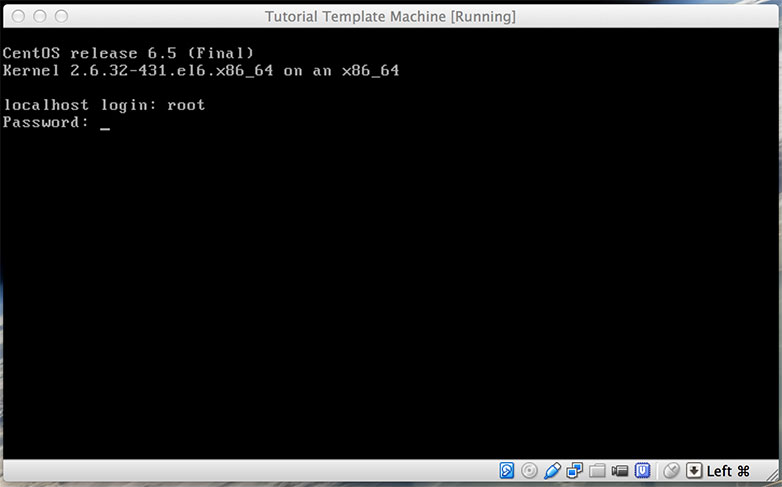
Once it’s finished rebooting, you should be presented a login screen. Log in with the root user and the password you created above.
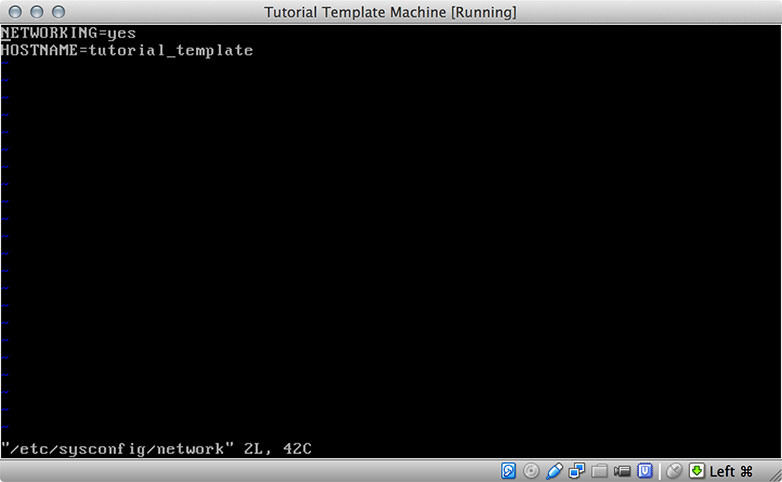
Once logged in, now we setup the networking. Edit /etc/sysconfig/network and set the hostname of the template virtual machine. I’ve used “tutorial_template”.
vi /etc/sysconfig/network
Now edit /etc/sysconfig/network-scripts/ifcfg-eth0. Remove HWADDR, TYPE, UUID, and NM_CONTROLLED if needed. Set ONBOOT=yes.
[root@localhost~]# vi /etc/sysconfig/network-scripts/ifcfg-eth0
Set to: DEVICE=eth0 ONBOOT=yes BOOTPROTO=dhcp
Now edit /etc/sysconfig/network-scripts/ifcfg-eth1. Remove HWADDR, TYPE, UUID, and NM_CONTROLLED if needed.
[root@localhost~]# vi /etc/sysconfig/network-scripts/ifcfg-eth0
Set to:
DEVICE=eth1
ONBOOT=yes
BOOTPROTO=static
IPADDR=192.168.56.210
The IPADDR value comes from above when we setup the Host-only Network.
Restart the network service to pull the new settings.
[root@localhost~]# service network restart
You should now be able to ping google.com or any other hostname to verify networking is working.
[root@tutorial_template~]# ping google.com
It is much easier to navigate via iTerm or iTerm2. Plus it allows me to copy and paste and for this tutorial. So now we’ll connect to our new virtual machine via iTerm.
bens-mbp:~ ben$ ssh root@192.168.56.210
The authenticity of host '192.168.56.210 (192.168.56.210)' can't be established.
RSA key fingerprint is 37:9a:b9:2d:4b:29:c7:a6:87:76:5a:24:89:1a:a6:cb.
Are you sure you want to continue connecting (yes/no)? yes
Warning: Permanently added '192.168.56.210' (RSA) to the list of known hosts.
root@192.168.56.210's password:
Last login: Wed Apr  2 12:42:22 2014
[root@tutorial_template~]#
Now we’ll install a few things we’ll need throughout the tutorial.
[root@tutorial_template
~]# yum install wget ntp
Loaded
plugins: fastestmirror
Loading
mirror speeds from cached hostfile
* base: mirrors.cmich.edu
* extras: yum.singlehop.com
* updates: mirrors.centarra.com
Setting up Install Process
Resolving Dependencies
--> Running transaction check
---> Package ntp.x86_64 0:4.2.6p5-1.el6.centos will be installed
--> Processing Dependency: ntpdate = 4.2.6p5-1.el6.centos for package: ntp-4.2.6p5-1.el6.centos.x86_64
---> Package wget.x86_64 0:1.12-1.11.el6_5 will be installed
--> Running transaction check
---> Package ntpdate.x86_64 0:4.2.6p5-1.el6.centos will be installed
--> Finished Dependency Resolution

Dependencies Resolved

===========================================================================================
Package
          Arch             Version                        Repository
       Size
===========================================================================================
Installing:
ntp              x86_64           4.2.6p5-1.el6.centos           base             592 k
wget             x86_64           1.12-1.11.el6_5                updates          483 k
Installing for dependencies:
ntpdate          x86_64           4.2.6p5-1.el6.centos           base              75 k

Transaction Summary
===========================================================================================
Install      3 Package(s)

Total download size: 1.1 M
Installed size: 3.5 M
Is this ok [y/N]: y
Downloading Packages:
(1/3): ntp-4.2.6p5-1.el6.centos.x86_64.rpm                          | 592 kB    00:00
(2/3): ntpdate-4.2.6p5-1.el6.centos.x86_64.rpm                      |  75 kB    00:00
(3/3): wget-1.12-1.11.el6_5.x86_64.rpm                              | 483 kB    00:00
-------------------------------------------------------------------------------------------
Total
                                                     474 kB/s | 1.1
MB     00:02
Running rpm_check_debug
Running Transaction Test
Transaction Test Succeeded
Running Transaction
Installing: ntpdate-4.2.6p5-1.el6.centos.x86_64                                    1/3
Installing: ntp-4.2.6p5-1.el6.centos.x86_64                                        2/3
Installing: wget-1.12-1.11.el6_5.x86_64                                            3/3
Verifying : wget-1.12-1.11.el6_5.x86_64                                            1/3
Verifying : ntp-4.2.6p5-1.el6.centos.x86_64                                        2/3
Verifying : ntpdate-4.2.6p5-1.el6.centos.x86_64                                    3/3

Installed:
ntp.x86_64 0:4.2.6p5-1.el6.centos              wget.x86_64 0:1.12-1.11.el6_5

Dependency Installed:
ntpdate.x86_64 0:4.2.6p5-1.el6.centos

Complete!
[root@tutorial_template~]#
Start the ntpd service and check the date.
[root@tutorial_template ~]# service ntpd start
Starting ntpd:                                             [  OK  ]
[root@tutorial_template~]# date
Wed Apr  2 13:20:36 EDT 2014
[root@tutorial_template~]#
Since this template will primarily be used for database machines, go ahead and install the Percona repo.
[root@tutorial_template~]# yum install http://www.percona.com/downloads/percona-release/percona-release-0.0-1.x86_64.rpm
Loaded plugins: fastestmirror
Loading mirror speeds from cached hostfile
* base: mirrors.cmich.edu
* extras: yum.singlehop.com
* updates: mirrors.centarra.com
Setting up Install Process
percona-release-0.0-1.x86_64.rpm                                   | 6.1 kB     00:00
Examining /var/tmp/yum-root-GQ4esC/percona-release-0.0-1.x86_64.rpm: percona-release-0.0-1.x86_64
Marking /var/tmp/yum-root-GQ4esC/percona-release-0.0-1.x86_64.rpm to be installed
Resolving Dependencies
--> Running transaction check
---> Package percona-release.x86_64 0:0.0-1 will be installed
--> Finished Dependency Resolution

Dependencies Resolved
===========================================================================================
Package              Arch         Version      Repository                          Size
===========================================================================================
Installing:
percona-release      x86_64       0.0-1        /percona-release-0.0-1.x86_64  3.6 k

Transaction Summary
===========================================================================================
Install      1 Package(s)

Total size: 3.6 k
Installed size: 3.6 k
Is this ok [y/N]: y
Downloading Packages:
Running rpm_check_debug
Running Transaction Test
Transaction Test Succeeded
Running Transaction
Installing: percona-release-0.0-1.x86_64                                           1/1
Verifying : percona-release-0.0-1.x86_64                                           1/1

Installed:
percona-release.x86_64 0:0.0-1

Complete!
[root@tutorial_template~]#
As well, we’ll setup the MariaDB repo.
[root@tutorial_template~]# vi /etc/yum.repos.d/MariaDB.repo
Paste the following and save:
# MariaDB 5.5 CentOS repository list - created 2014-04-02 18:03 UTC
# http://mariadb.org/mariadb/repositories/
[mariadb]
name = MariaDB
baseurl = http://yum.mariadb.org/5.5/centos6-amd64
gpgkey=https://yum.mariadb.org/RPM-GPG-KEY-MariaDB
gpgcheck=1
Next we’ll create a user for logging in that isn’t root.
[root@tutorial_template~]# useradd mariadb
[root@tutorial_template~]# passwd mariadb
Changing password for user mariadb.
New password:
Retype new password:
passwd: all authentication tokens updated successfully.
[root@tutorial_template~]#
Now add the new users to the sudoers.
[root@tutorial_template~]# visudo
For our tutorial, we added the following at the bottom:
#mariadb account for demonstration machines
mariadb ALL=(ALL)       ALL
Lastly, create this quick shell script to make setting the network configurations a breeze on the future virtual machines to be cloned from this one.
[root@tutorial_template~]# vi ~/clone_network_setup.sh
#!/bin/bash
# Script to setup networking after cloning from template.
# Must be ran as root.
# Ran like: clone_network_setup.sh 192.168.56.202 hostnametest

NEWIP=$1
NEWHOSTNAME=$2

rm -f /etc/udev/rules.d/70-persistent-net.rules

cat > /etc/sysconfig/network-scripts/ifcfg-eth1 <<DELIMIT
DEVICE=eth1
ONBOOT=yes
BOOTPROTO=static
IPADDR=$NEWIP
DELIMIT

cat > /etc/sysconfig/network <<DELIMIT
NETWORKING=yes
HOSTNAME=$NEWHOSTNAME
DELIMIT

cat > /etc/resolv.conf <<DELIMIT
nameserver
8.8.8.8
nameserver
8.8.4.4
DELIMIT

reboot
[root@tutorial_template~]# chmod 700 ~/clone_network_setup.sh
Congrats, your virtual machine template is ready.