
Intro
In this blogpost we’re going to use the photo-sharing application that has been demoed during MariaDB’s M|17 conference. The sources of the application are available for download on Github. The purpose of this blog post is to demonstrate using a MariaDB database server in your stack when building microservice applications. During this post we’re going to talk about what microservices are, the architecture of the photo-sharing application, bootstrapping the application, and scaling parts of the application. The code demoed in this blogpost could be used as a starting template for building your own microservices. The code is tested against Docker version 17.03, Docker Machine version 0.10.0 and VirtualBox version 5.1.12, and the application has been created and tested on a Mac. Let’s start with talking about what microservices are.
What are Microservices
Creating applications with microservices is an approach that attempts to avoid the problems often found in monolithic applications. It is an approach that makes web-based development more agile and code bases easier to understand. Lots of companies claim to use the microservice approach, but they all have their own definitions and best practises. While there is no mutual agreement on what microservices really are, there are some similarities on how most companies are using microservices. With the microservice approach, developers create the application as a suite of small independent services, each independently deployable, running on a unique process, and communicate with each other using public API’s. The main benefits from this approach are resiliency of services, ease of deployment and independent scaling.
High-Level Architecture of the Application
The photo-sharing application has been created utilizing the microservices architecture. This means that the business logic is divided into multiple smaller services, each responsible for a certain set of tasks and responsible for their own data. The services can communicate by using each other’s API.
We divided the application into the following services: profile-service, photo-service, vote-service, comment-service, authentication-service and web-server. The web-server also functions as Proxy and API gateway. The services are split into five separate services for a couple of reasons. We wanted to make the services small, and the first step in to making them small was by creating a service for each domain. In our application we identified four domains: profiles, votes, comments and photos. This resulted in the first four services: profile, vote, comment and photo-service. The authentication-service is not in this list and was created to separate authentication functionality from profile management. This solution shows its value once authentication traffic starts growing, the container orchestrator can then scale the authentication-service independently. Also the authentication-service can easily be rewritten or replaced when the decision is made to use a third party authentication standard, without touching the profile service.
See figure 1 for a visualization of how the services are placed and how they are connected to each other. Note that not all services are interchanging data. For example the authentication-service doesn’t need to communicate with services like photo-service or vote-service.
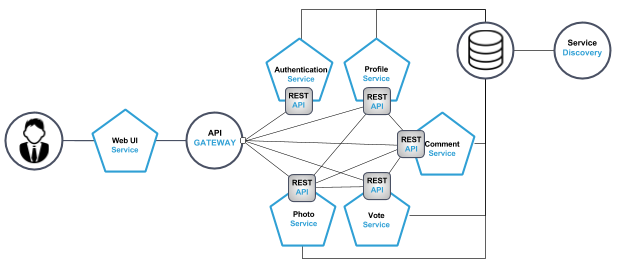
Figure 1. Top level domain of the photo sharing application.
Downloading and starting the application
Now we know a little bit about the architecture of the application it is time to download the code and to bootstrap the application. First we’re going to get the application from Github and after that we’re using Docker Swarm and Docker Stacks to bootstrap the application.
From this point you’ll need a terminal.
Preparing our environment
The photo-sharing application is available on Github and can be downloaded here. After downloading, the first thing we need to do is set-up our environment on top of which the application is running. The sources you’ve just downloaded contain a /scripts directory, and within that directory the create_machines.sh script.
The script is responsible for two things, which are the creation of 5 virtual machines and to configure Docker Swarm. If you can’t run this script on your machine then please follow the instructions in the Docker documentation to create a Swarm on your own machine. In this blogpost we use the following machine names:
- manager1
- worker1
- worker2
- worker3
- worker4
If you can run a bash script on your machine then run the following command to setup your environment:
./create_machines.shAfter the machines are created we’re going to deploy a cluster visualizer. For that we need the IP of the cluster manager. Use the following command to retrieve the IP address of the manager:
docker-machine ip manager1Now replace ‘YOUR_IP’ with the IP from above, and run the following command to deploy the visualizer:
docker-machine ssh manager1 docker run -it -d -p 8080:8080 -e HOST=YOUR_IP -e PORT=8080 -v /var/run/docker.sock:/var/run/docker.sock manomarks/visualizerAfter we’ve deployed the visualizer we’re going to deploy an etcd instance on the manager-machine for the service discovery for our database cluster. Again, use the IP address of the manager and then run the following command (replace YOUR_IP in 4 locations):
docker-machine ssh manager1 docker run -d -v /usr/share/ca-certificates/:/etc/ssl/certs -p 4001:4001 -p 2380:2380 -p 2379:2379
--name etcd quay.io/coreos/etcd etcd
-name etcd0
-advertise-client-urls http://YOUR_IP:2379,http://YOUR_IP:4001
-listen-client-urls http://0.0.0.0:2379,http://0.0.0.0:4001
-initial-advertise-peer-urls http://YOUR_IP:2380
-listen-peer-urls http://0.0.0.0:2380
-initial-cluster-token etcd-cluster-1
-initial-cluster etcd0=http://YOUR_IP:2380
-initial-cluster-state new
We need to verify that our machines are properly working, and to do that we are going to access the visualizer in our webbrowser.
Use the manager’s IP with port 8080 to access the visualizer, e.g. 192.168.99.100:8080. See figure 2 to see what the visualizer looks like.
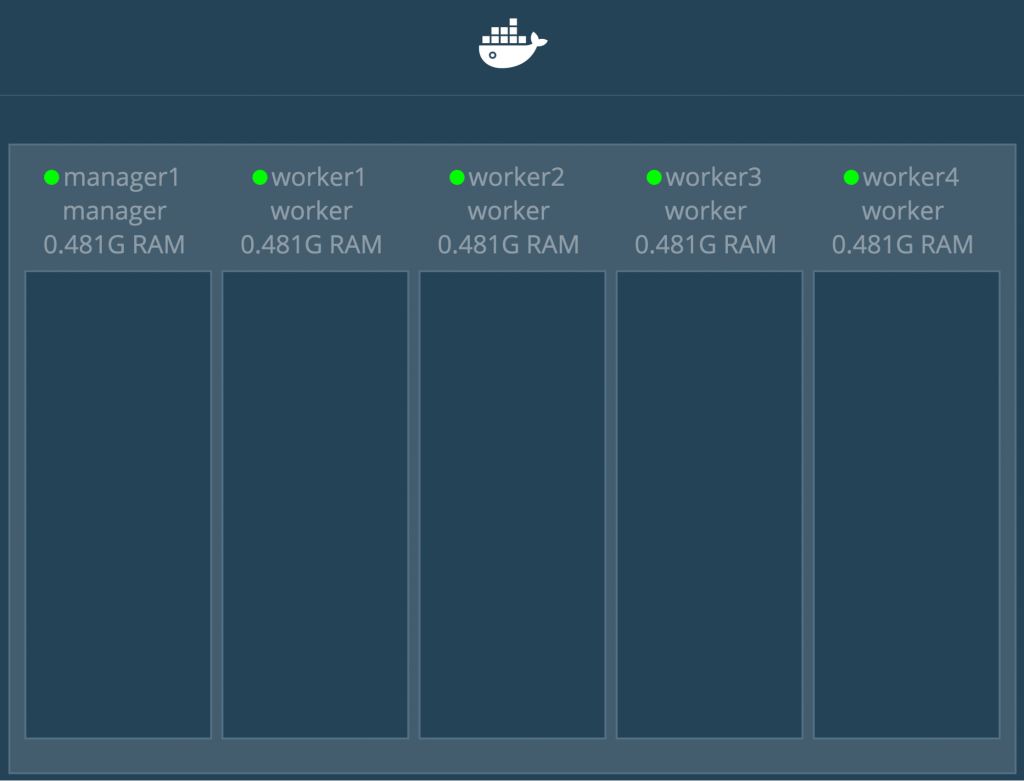
Figure 2. The manomarks/visualizer without any running services.
Starting the stack
To direct the terminal to the Docker Engine of the Swarm-manager we used the command:
eval $(docker-machine env manager1)Now the first thing that we need to do is we have to pass the location of the etcd service to our database configuration. To do that we need to edit the docker-compose-stacks.yml file and add the IP and port to the “DISCOVERY_SERVICE” environment variable of the database. Get the IP of the manager with:
docker-machine ip manager1Use the IP and add it to configuration on line 126. Change it so it looks something like this example:
- "DISCOVERY_SERVICE=192.168.99.100:2379Now we can deploy our application. Before executing the next command, make sure that you’re in the root folder of the photo-sharing application. Run the following command to start the application:
docker stack deploy --compose-file docker-compose-stacks.yml demoThis command deploys our application and distributes the services across our virtual machines. Deploying of the services might take a few minutes, depending on the speed of your internet connection.
Using the photo-sharing application
To check if the photo-sharing application is running you simply have to go to the IP of any of the machines and use the port of the web application, port 4999. We can use any machine because all nodes in Docker Swarm are participating in an ingress routing mesh. To get the IP of the machine use the command:
docker-machine ip manager1In our case the web application can be access by using the following address: 192.168.99.100:4999.

Figure 3. The User Interface of the photo-sharing application.
Now the application is running you can start using it. The application is a photo-sharing and photo-voting application. An anonymous user can visit the website via the browser and can toggle between three different timelines of photos. The first one is a timeline of uploaded photos (ordered by last uploaded), second one is a timeline of hot photos (based on upvotes), and the last one is a timeline of trending photos. The difference between hot photos and trending photos is that the hot photos timeline is showing photos only from the current day; which means that every day there’s a different hot timeline.
People who visit the website can create a free account. An account gives the user the privilege to upload photos, upvote or downvote a photo and leave a comment on photos. If a visitor does not create an account he or she can still see the pictures but they cannot upload a photo, leave a comment or vote.
The photo-sharing application is written in Go and to connect the application with the MariaDB database we use the by the community developed database driver: go-sql-driver/mysql.
Scaling the application
The next thing we want to do is scale our application. See figure 4 to see the current state of the cluster.
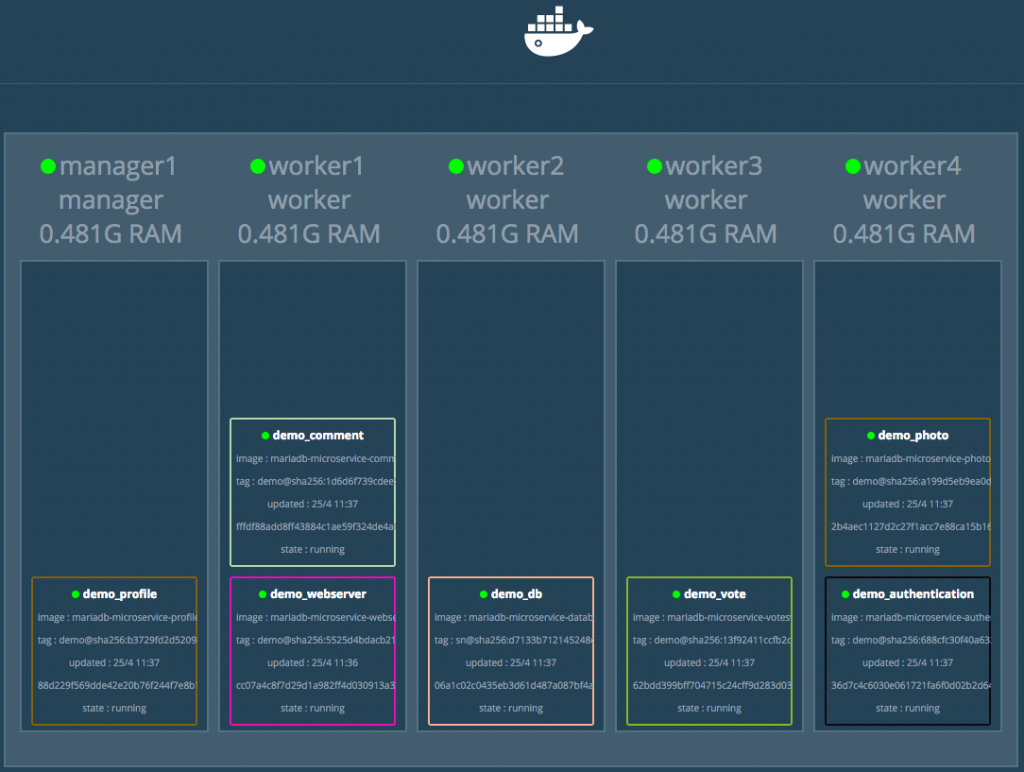
Figure 4. Cluster overview before the database is scaled.
To scale our application we use docker service scale, with docker service scale you can scale any service you want. For the purpose of demonstration we’re going to scale the database. Scale the database to three instances with the following command:
docker service scale demo_db=3After scaling we have a three node Galera Cluster. The database containers takes care of setting up the replication. See figure 5 to see the current state of the cluster.
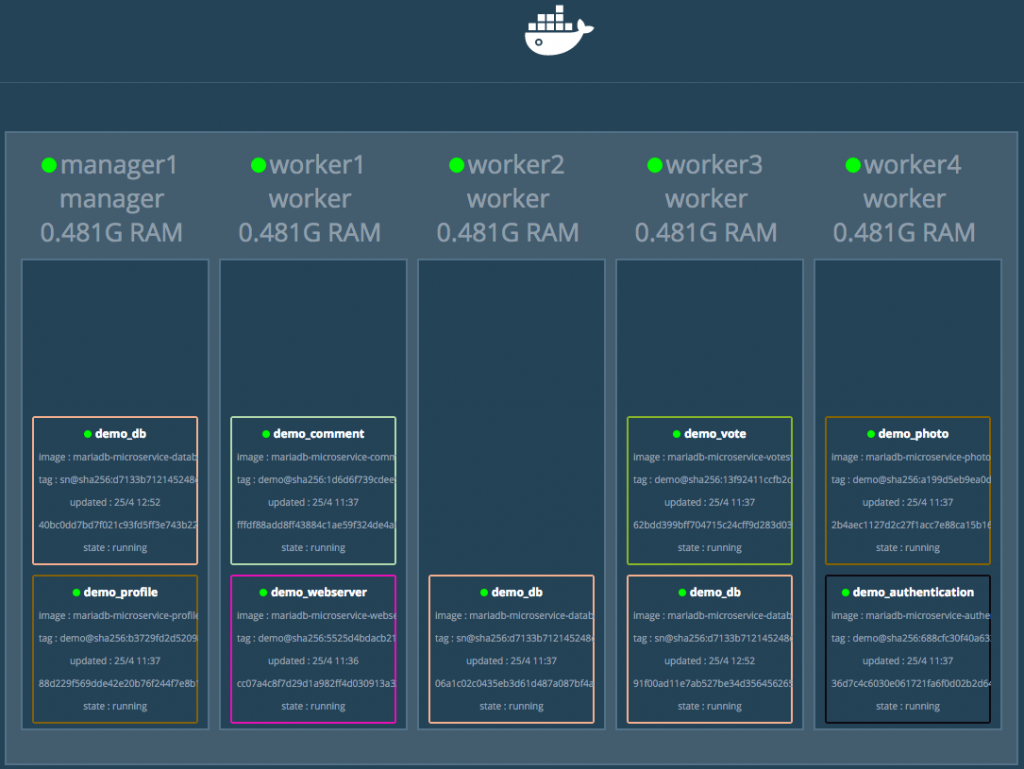
Figure 5. Cluster overview after the database is scaled.
The traffic will automatically be spread over all the instances. The swarm manager uses internal load balancing to distribute requests among other services. Load balancing is done based upon DNS name of the service.
Conclusion
In this blogpost we’ve downloaded the photo-sharing application, created a cluster of machines, run the application on the cluster and we ended with scaling the application. The purpose of this blogpost was to merely demonstrate a way of using MariaDB Galera Cluster with microservices. It was a lot to cover for a blogpost and there is still much more to consider before all of this is ready for production. Many areas have not been touched during this blogpost. Things that you should think about before running production are (and not limited to): security, automatic failover, storing data, backups, disaster recovery, using an API gateway, improve overall code, data integrity, data aggregation and service boundaries.
Feel free to ask questions or provide feedback on this blogpost in the comments. Or if you have any suggestions for my next blog post; I’m happy to learn about that as well.
Related Topics
- Martin Fowler’s article on Microservices
- Chris Richardson’s website about Microservices
- Christian Posta’s blogpost about “The Hardest Part About Microservice: Your Data”
- MariaDB’s Knowledge Base article on Installing and using MariaDB via Docker
- MariaDB’s Knowledge Base article on MariaDB Galera Cluster