Getting Started with MariaDB SkySQL for Analytics

MariaDB recently announced SkySQL, the first DBaaS (database-as-a-service) to unlock the power of the MariaDB Platform. You’re likely familiar with the traditional row-based storage that RDBMS platforms offer, and while MariaDB SkySQL certainly offers that approach, it also provides much more.
MariaDB Platform for Analytics leverages the columnar capabilities of MariaDB ColumnStore with data placed on object storage in the cloud. With this functionality, you not only get the high-performance analytical benefits of columnar storage, but you eliminate the need to pre-allocate storage for growth. MariaDB Platform for Analytics allows you to perform real-time ad hoc queries on big data using inexpensive pay-as-you-go object storage.
In this blog post, I’d like to show you just how easy it is to deploy a MariaDB SkySQL database service instance, connect to it, load data into it, and stand up a lightweight web application on it – all within a matter of minutes.
Rather than telling you how easy it is to get started with MariaDB SkySQL for analytical workloads, I’d like to show you. The rest of this post walks you through the process.
Getting Started Is Easy
1. Login
2. Launch a service
3. Connect to your service
4. Create and load the database
5. Stand up the app
If you have MariaDB Platform for Analytics on SkySQL already connected, skip to create and load the database.
Log In
1. Visit Get Started with SkySQL. New customers can register for access. Existing customers can log in.
2. When you’ve successfully submitted your billing profile information, you’ll see the “Success” screen. Click on the “Get Started” button.
Launch a Service
1. From the “Start up a Service” page, you’ll see three options: Transactions, Analytics and Smart Transactions. For this example, click on the “Start” button under “Analytics” and select these parameters:
a. MariaDB Platform for Analytics
b. In a region of your choice
c. Sky-04×15, the smallest instance size
2. While an estimated monthly cost is provided, SkySQL instances have metered per-minute pricing. You only pay for what you use. Charges stop accruing when the database service is deleted.
3. Give the database service a name and click on the “Launch Service” button.
You’ll see that your service is “Pending” while it is being provisioned. While you are waiting for it to become “Healthy” you can whitelist the IP addresses that you want to have access to the service.
Database services on SkySQL are protected by a firewall which is configured to reject all unapproved connections. To connect to your database service, you must whitelist the IP address of the system making the connection.
Addresses can be added to the whitelist at any time after the database service has been created.
1. Click on “Your Services” in the main SkySQL menu and click on the name of the desired database.
2. Click on the pencil icon on the “Whitelisted IP Addresses” heading.
3. Specify an IPv4 address or IPv4 netblock to be whitelisted, and click on the “Add” button and then click on the “Submit” button.
Connect to Your Service
Database services on SkySQL are live and able to receive connections when they have a “Healthy” status.
Connecting to your service on SkySQL requires:
- whitelisting the IP address (as detailed above)
- the Fully Qualified Domain Name (FQDN)
- the Certificate Authority (CA) file
- the port number (MariaDB SkySQL does not use 3306, the default client port)
- the username and password
All of the information needed to connect is available from the Service Details page. We will use the MariaDB command-line client to make our first connection. Connections to the service can be made with any compatible client, but may require additional configuration.
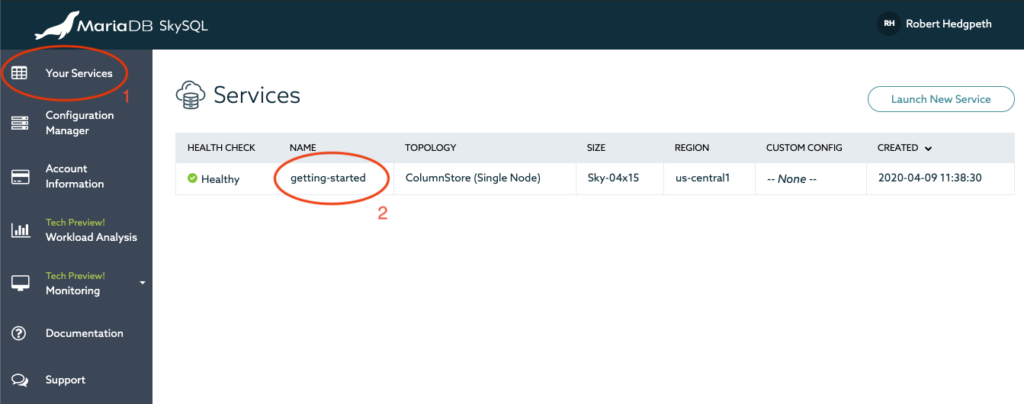
1. Click on “Your Services” in the main SkySQL menu.
2. Click on the service name. This takes you to the service details page.
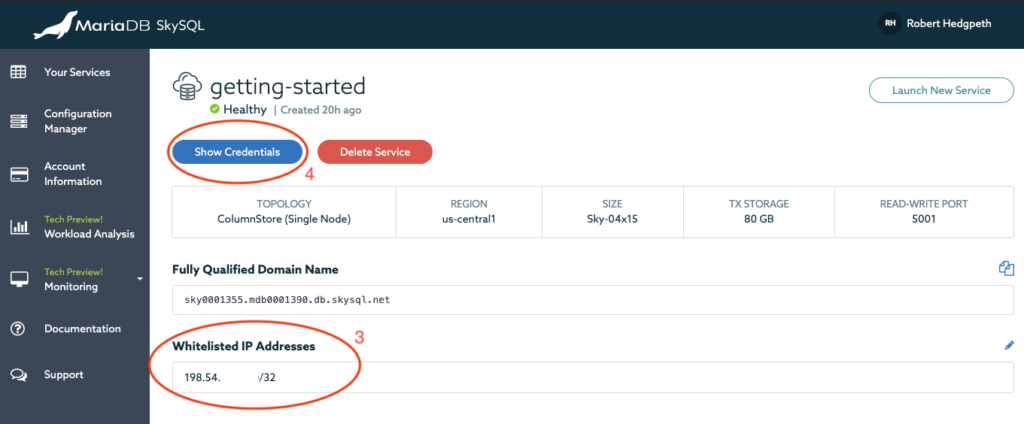
3. Check that you have your IP address whitelisted.
4. Click on the “Show Credentials” button.
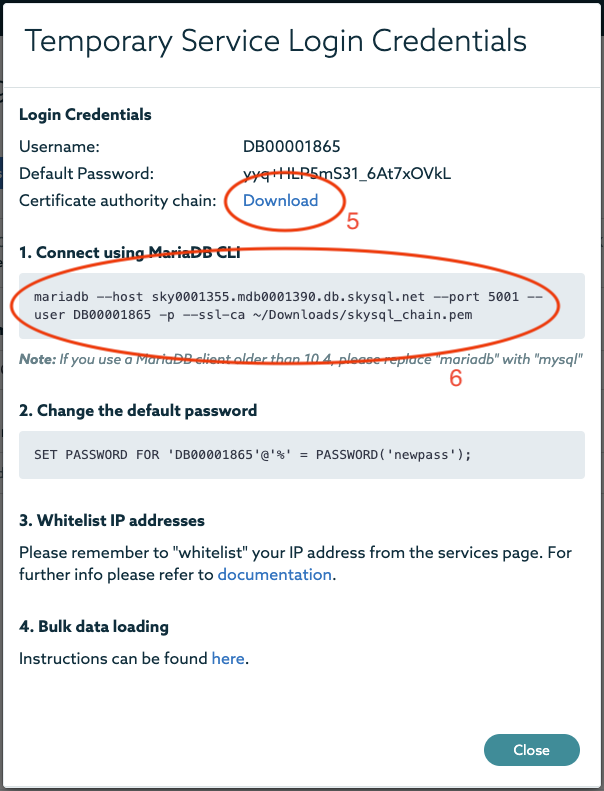
5. Click the “Download” link to download the Certificate Authority (CA). The downloaded file is named skysql_chain.pem or skysql_chain.cer.
6. Copy the information in the “Connect Using MariaDB CLI” box and paste it into a terminal window.
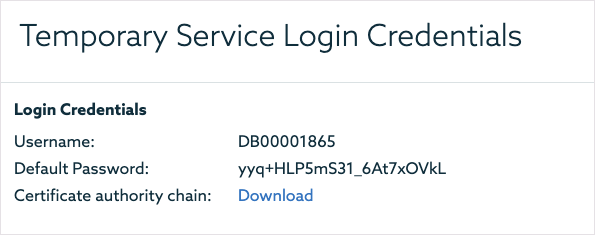
7. Copy and paste the password given under the “Show Credentials” when prompted for a password. (The database shown in the image below has been decommissioned; the image does not expose a live password.)
Password
Once you’ve connected to your database service, you can update the password with a SET PASSWORD statement as shown in the “Change the default password” box in the Credentials window. Using the PASSWORD() function hashes the password in the database. Database services on SkySQL are configured by default to validate password strength.
Analytics Dataset
MariaDB Platform for Analytics leverages the columnar capabilities of MariaDB ColumnStore, and as such it provides the capability to query large datasets on the fly. In fact, not only can you create the queries with complicated filters, but you can expect incredible performance without the need to add indexes.
Talk is cheap. Us developers yearn to dive into some code and validate such claims. And in order to put SkySQL analytical capabilities to the test we’re going to analyze data. A lot of data.
In our example, you’ll use a dataset that comes directly from the United States Department of Transportation, specifically, US domestic flight data from the Bureau of Transportation Statistics on time performance dataset.
The data will live in a single database containing three tables; airlines, airports, and flights. Once loaded, the tables will contain the following number of records.

Create and Load the Database
In this section you’ll be accessing your SkySQL database service instance to create the database and tables, and to load the tables with data.
Requirements for this example:
- MariaDB Client, used to connect to the service.
- Bash (if you are using Windows 10, you will need to enable the Windows Subsystem for Linux), used to run the data download script
- Curl, used to retrieve the sample data set
1. Clone the repository.
$ git clone

https://github.com/mariadb-corporation/dev-example-flights
2. If you don’t have Git installed, you can download the repository directly.
3. From within the dev-example-flights directory, download the flight data.
$ ./get_flight_data.sh
By default the “get_flight_data” script downloads all US flight data between 1990 and 2020, approximately 182 million records (~30 GB of data). You can adjust the amount of flight data that is downloaded by modifying get_flight_data.sh.
4. If you haven’t already done so, download the SkySQL Certificate authority chain file (.pem | .cer). Copy the file to the root of the project, dev-example-flights.
5. Create the database, tables, and load the data for airlines, airports, and flights.
$ ./create_and_load.sh host_url port user password
The create_and_load.sh scripts requires four arguments to be supplied:
- host_url: SkySQL service fully qualified domain name
- port: SkySQL service read-write post number
- user: SkySQL service username
- password: SkySQL service password
For example:
$ ./create_and_load.sh sky0001355.mdb0001390.db.skysql.net 5001 'DB00001865' '****'
Note: Remember to wrap argument values in single quotes if they contain special characters (e.g. value! should be wrapped as ‘value!’)
For the sake of simplicity the “create_and_load” script contains several operations used to connect to MariaDB SkySQL, create the schema, and load the data for airlines, airports, and airlines using the MariaDB client.
For more information on how to load data into MariaDB SkySQL please check out the SkySQL Documentation.
Build and Run the Flights Application
Now that the data has been loaded into SkySQL you can build and run an application that exists within the repository you previously pulled down. Flights is a web application, backed by the power of the MariaDB Node.js Connector and the MariaDB ColumnStore database, which allows you to analyze all of the data you’ve loaded into SkySQL.
The application has three tiers:
- UI: React.js
- API: Node.js (and uses the MariaDB Node.js Connector to communicate with the back-end.
- Back-end: MariaDB Platform for Analytics on SkySQL
Requirements
- Download and install Node.js and NPM (Node Package Manager) from https://nodejs.org/en/download/. You need Node.js version v8+. You can check for version with:
$ node -v
Prepare the app
1. Install the dependencies for the React.js project.
a. Navigate to /path/to/dev-example-flights/client
b. Execute:
$ npm install
2. Install the dependencies for the Node.js project.
a. Navigate to /path/to/dev-example-flights/api/nodejs
b. Execute:
$ npm install
3. Add connection details. We will use a .env to hold your connection details. An .env (environment) file is used to prevent sensitive information from being pushed into source control. While it is certainly possible to put the connection values directly within the db.js file, it is not advisable to do so in practice.
a. Create the .env file in /path/to/dev-example-flights/api/nodejs:
$ touch .env
b. Open the .env with a text or code editor. Add your SkySQL connection details below and then copy and paste it into the .env file. You must customize these values to match your service.
DB_HOST=xxxx.mdb0001390.db.skysql.net

DB_PORT=5001

DB_USER=DB00001574

DB_PASS=**************

DB_NAME=flights
4. Move or copy the SkySQL certificate authority chain file to /path/to/dev-example-flights/api/nodejs
5. Once the certificate authority chain (.pem | .cer) has been added to the /path/to/dev-example-flights/api/nodejs directory, modify the db.js file by un-commenting lines to enable SSL.
a. To un-comment, remove // from the following lines:
// const fs = require("fs");
// const serverCert = [fs.readFileSync("skysql_chain.pem", "utf8")];
so they become:
const fs = require("fs");
const serverCert = [fs.readFileSync("skysql_chain.pem", "utf8")];
b. And remove /* and */ from the following section:
   /*
    ,ssl: {
      ca: serverCert
    }*/
so it becomes:
   ,ssl: {
      ca: serverCert
    }
Run the App
1. Start the Node.js project.
a. Navigate to /path/to/dev-example-flights/api/nodejs
b. Execute:
$ npm start
2. Start the React.js project.
a. Navigate to /path/to/dev-example-flights/client
b. Execute:
$ npm start
3. Navigate to http://localhost:3000 within your web browser.
Results
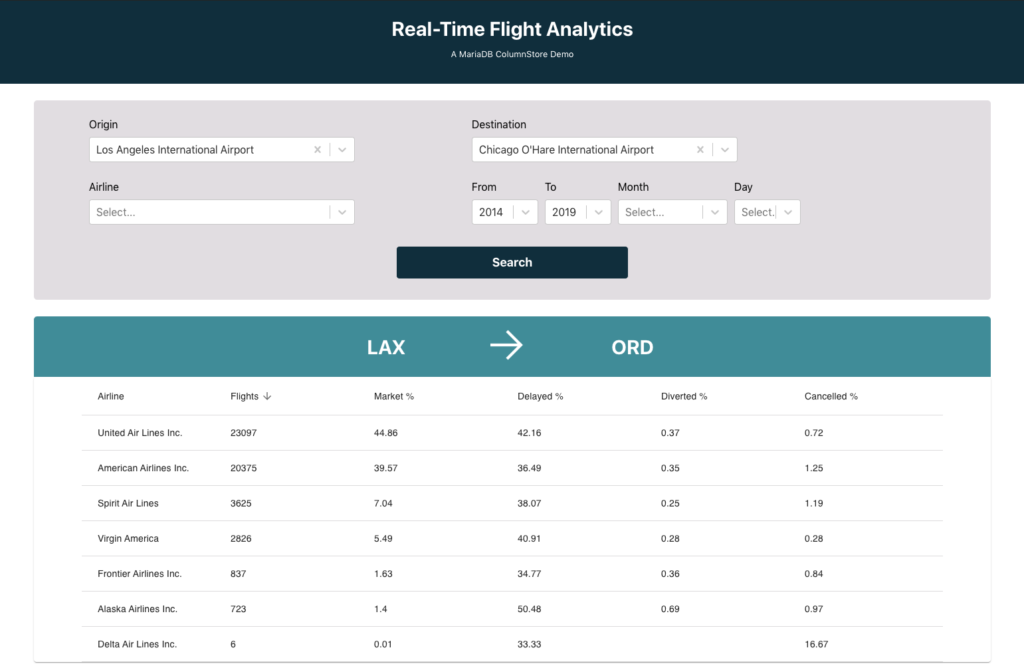
When the application loads you’ll see a variety of dropdown options. The application uses the selections from the dropdown controls to construct queries to execute on the dataset you’ve loaded into your SkySQL service.
You can also connect to your SkySQL database service to execute queries manually. For example:
SELECT a.airline, COUNT(*) FROM flights.airlines a INNER JOIN flights.flights f ON a.iata_code = f.carrier GROUP BY a.airline ORDER BY count(*) DESC;


+------------------------------+----------+
| airline                      | count(*) |
+------------------------------+----------+
| Southwest Airlines Co.       | 28265916 |
| Delta Air Lines Inc.         | 23262488 |
| American Airlines Inc.       | 20647583 |
| United Air Lines Inc.        | 17104399 |
| US Airways Inc.              | 15117797 |
| Skywest Airlines Inc.        | 10029578 |
| American Eagle Airlines Inc. |  7303671 |
| ExpressJet                   |  6469679 |
| Alaska Airlines Inc.         |  4514031 |
| JetBlue Airways              |  3551776 |
| AirTran Airways Inc.         |  2420210 |
| Mesa Airlines Inc            |  2101154 |
| Endeavor Air                 |  1824463 |
| Frontier Airlines Inc.       |  1361239 |
| Hawaiian Airlines Inc.       |  1090955 |
| Spirit Air Lines             |   793419 |
| Virgin America               |   389060 |
+------------------------------+----------+
Next Steps
Ready to sign up? Get started on SkySQL now.
Already signed up? We encourage you to continue exploring MariaDB SkySQL!
SkySQL Documentation is available at https://mariadb.com/products/skysql/docs/.
And I would welcome your feedback on GitHub or by Twitter (@mariadb).


